I don't often take selfies, but here's one for the record. That truck behind me was up for sale and for some reason I went back and got it after I thought it through and decided not to buy it. As I was working on it, I asked myself "what was I thinking?". As I was driving it, looking at the MPG, I again wondered, "what was I thinking?"
 |
| Me and my truck |
When I replaced my turbo, I sure could have used a step by step guide on how to remove the turbo. It would have saved me a lot of time. So, to satisfy your curiosity, here's what I would do if I had to do this again. I hope I don't leave out any important steps.
At first glance, opening the hood, I didn't know what was what. I've never had a diesel before.
 |
| What's what under the hood |
 |
| How to get at those awkward bolts |
For many of the exhaust bolts, we'll need a flex head ratchet handle like the Craftsman 44815 because you can put a wrench on the handle and turn bolts facing the opposite direction, like this photo.
Here's how I'd do it if I had to again.
1. Disconnect both batteries and remove the driver's side battery.
2. Drain about 2 gallons of coolant from the radiator.
3. Remove the coolant reservoir / battery box assembly. It's held on with four bolts and some hoses. There's a vacuum reservoir on the bottom of the battery box with a vacuum line attached to the small port. You need to pull the wire retainer clip from the coolant hose end to remove it from the reservoir. Be careful not to bend the clip so you can reuse it.
 |
| Battery box / vacuum reservoir / coolant reservoir |
4. Remove the fuel cooler / crossover tube assembly and mounting bracket as a unit:
Disconnect the fuel lines, drain the coolant, and disconnect the coolant lines.
I could have used this guide when I started. It would have been easier to get the coolant reservoir out of the way before this step. Remove the nuts from the three studs at the bottom center of the above picture. The oil dipstick is bolted to the stud on the left (towards the front of the truck). Remove that bolt, pull it off and there's another nut underneath you need to remove also. Then remove the two nuts on either side that hold it to the top of the valve cover. Slide the assembly toward the driver's side. Be careful not to damage the air seals. The air tube from the low side turbo can be pulled out.
 |
| The top right stud holding the fuel cooler assembly also holds an exhaust pressure sensor? |
 |
| The top left stud for the fuel cooler mount appears in this photo next to the hose clamp for the intercooler. |
 |
| Bottom bolts holding on fuel cooler assembly and oil dipstick |
 |
| There's the intake side of the high side turbo. It wouldn't turn by hand. Wait 'till you see the other side. |
5. Spray penetrating oil on all the exhaust bolts on the back of the turbo assembly. Remove the small exhaust tube with the sensor on the top and set it aside.
6. Remove the air filter assembly. Loosen the clamp to the low side turbo input. Remove the clamp on the hose going to the oil fill thing. Disconnect the plugs to the air filter monitor and MAF sensor. If the assembly doesn't lift out, there are two bolts supporting the mount: one by the battery, and one by the air intake. This picture is after I removed the turbo.
7. Remove the two banjo bolts that attach the oil supply lines to the
turbos. Then remove the four bolts holding the heat shield on. These
were rusted and I broke the one that I couldn't access with my electric
impact screwdriver. Remove the heat shield. It'll bend a little.
8. Disconnect the exhaust pipe between the EGR cooler and the back of the turbos (7 bolts). This won't have enough room to come out, but you can move it around to access the other bolts you need to get to. You need this pipe out of the way to get at the six bolts holding the exhaust inlet pipes on the back of the turbo assembly. There's a mounting bolt in the middle of the pipe. Get this one from under the truck. Try a 6 point 10mm shallow socket on a 6" wobbly extension attached to a U joint, attached to a long extension to your ratchet handle. For all the 10mm bolts on the exhaust, use a six point socket. Do not use a 12 point socket on any of the exhaust bolts. That may strip them.
9. Remove the six bolts holding the two exhaust pipes on the back side of the turbo assembly. You'll need to get creative with your flex head ratchet. You need to be able to put a wrench on the end of the ratchet handle, so the Craftsman 44815 works pretty well here. Then remove the exhaust pipe from the back of the low side turbo. Don't bend the clip on top. It holds the pipe in place while you clamp it. Lift the pipe up and back. You probably want help here.
10. Remove the two main bolts holding the turbo assembly to the engine. In this picture, I'm on the front bolt. The other one is directly behind it. Don't remove the 10mm nut holding the high side turbo's oil return line down.
 |
| Removing the front mounting bolt for the turbo assembly |
 |
| The two bolts and brackets that hold the turbo to the top of the engine |
11. With all the exhaust bolts out and the two main mounting bolts out, you'd think you can just remove the turbo. Well, maybe, and maybe not. There are two pins on the bottom of the turbo that may be a little tight or rusted. First of all, the turbo assembly weighs about 80 pounds. So I used a shop crane to try to lift while I used a pry bar. I probably had too much tension with the shop crane which made the pins bind.
The pins are under the high side turbo. If you lift front and back at the same, straight up, you may be able to get it off easier than I did. Keep in mind, it weights 80 pounds. Here's a shot of the bottom side, looking from the back side after I removed it.
 |
| Bottom side of the turbo assembly, with the low side turbo on the right |
 |
| Here's where the turbo was. You can see the two oil return passages for the low and high side turbos. Be sure to replace that o-ring on the high side turbo's oil return. The heat from the turbo cooks it and then it starts leaking. |
 |
| Here's what the turbo mounts to. There are two threaded holes for the bolts, and two holes for the pins. |
 |
| Have fun getting those exhaust bolts off. Good luck. |
 |
| Engine compartment after removing all that stuff |
 |
| I took the turbo out by moving it towards the driver's side, with a shop crane lifting it. |
 |
| The turbo assembly, suspended from a shop crane. A shop crane with a longer reach would have been nice. |
12. I had to use my press to separate the variable vane control from the turbo. It was in there pretty tightly.
Here's my press setup. The punch started to bend, so I replaced that with a 5 mm deep socket and tried again.
 |
| Here's my first setup for pressing out the control linkage for the variable vanes. |
To put it back on the new turbo cartridge, I oiled it and pressed it in with two pairs of pliers. Then I re-attached the E-clip.
So, what did I find?
 |
| That's some nasty buildup. Wait, why is the turbofan broken off? |
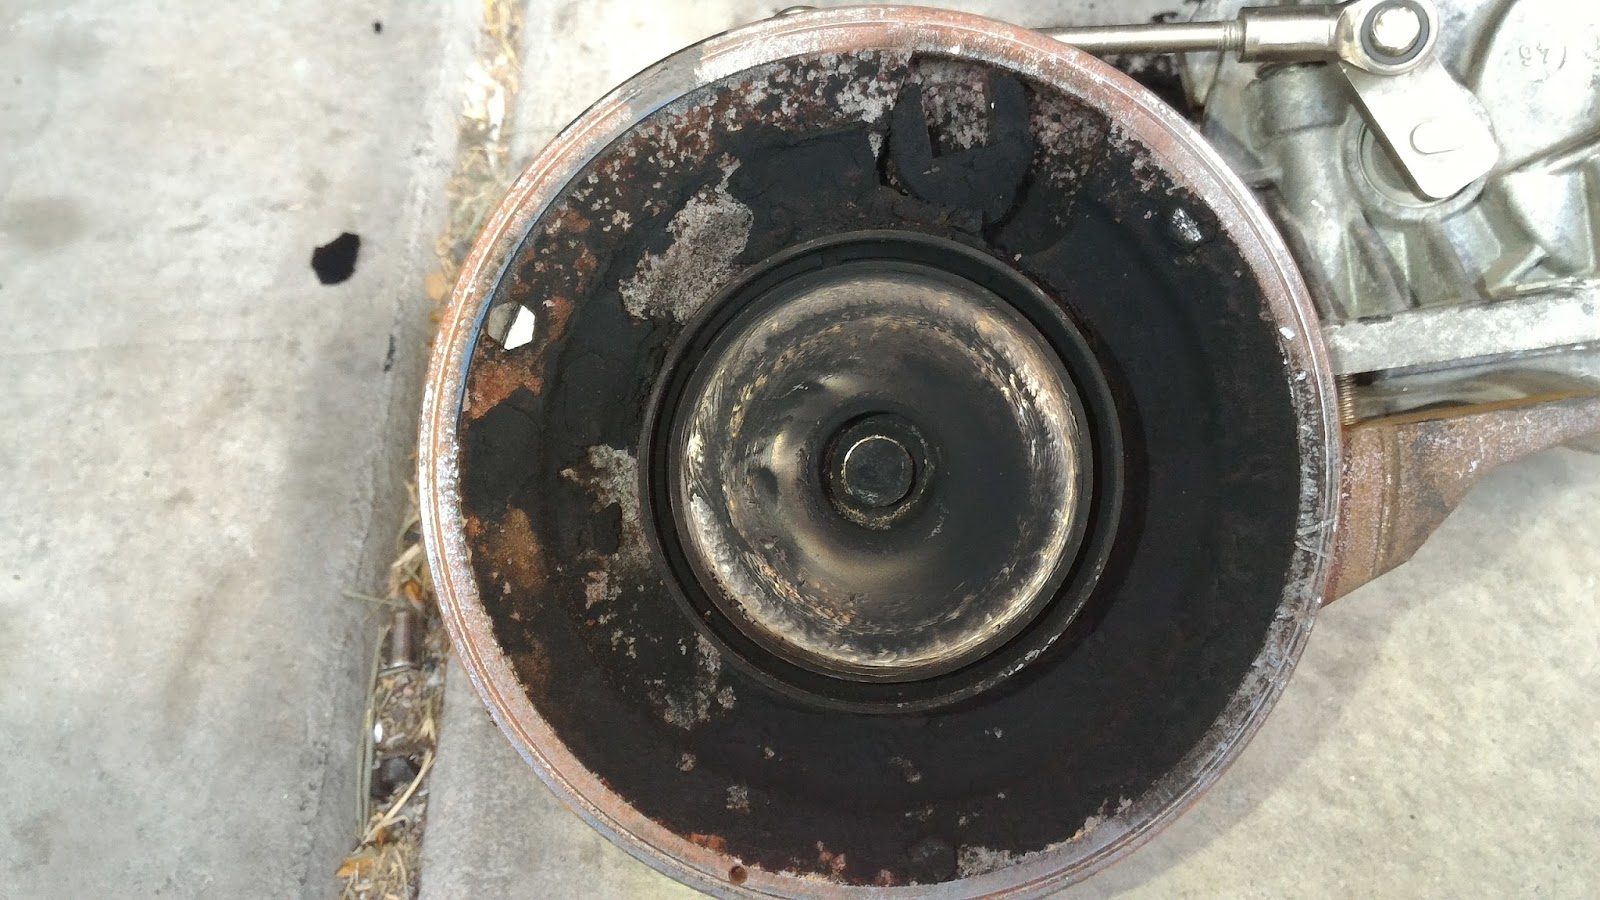
There's a turbo fan that broke off the shaft, and a lot of soot buildup. Here's where the turbo fan was supposed to be.
 |
| Exhaust side of the old turbo, missing the fan. |
 |
| The fan blades got pretty chewed up. |
 |
| After cleaning up the variable vane stuff |
 |
| New turbo cartridge, exhaust side |
 |
| New turbo cartridge, intake side |
I made the mistake of being too easy on the throttle after I got it all back together. So it turned on the check engine light for P132B (boost levels not achieved during learn cycle) and P2263 (turbocharger boost system performance). I was trying to get good gas mileage. My truck was telling me not to take it so easy. It'll get up and accelerate faster than any other car I've owned, but it gets 13 MPG.
Update Sept. 2017
I didn't replace the o-ring on the high side turbo oil return when I did this job. It was leaking about a quart every 300 miles by the time I finally took the turbo off again and replaced both the oil return o-rings on the high side and the weird seal on the low side. I was wondering if the two turbos were designed by two completely different engineers because they're so different.


John,
ReplyDeletethe best penatrating lube I have used is PJ1 Chain Lube in the yellow/black spray can. It's for non-oring chains. Ignore the blue can, that is the o-ring lube, and has no penetrating ability.
Let it sit for 5 minutes (more is better). I've seen this stuff do amazing things on frozen shafts and threaded hardware. The only thing that works better is an O/A torch. I've been using it since the early 80's.
It wicks in as a very light oil, and then congeals into a grease. I hope they haven't changed the composition, as my current can may be twenty years old. It's the only thing I do with it. I don't ride bikes anymore, sigh...
Is any calibration necessary after replacing the turbo? VGT calibration? Email response, please.
ReplyDeleteThanks for your video! I'm about to try this myself! I dont know why because my turbos are performing great in my 2008 ford f250 4x4 4 door 6.4 with 212,000 fully deleted with ngauge tuner running a 210hp tune! Teuck has only given me 1 problem ..keeps running out of fuel at a quarter tank it started this after a code was thrown for HPFP and it wouldn't crank for 2 hours then fired up and ran fine ever since but runs out if fuel at a quick at a quarter tank now . Any way I'm just looking to upgrade my turbos . What cartridge did you use and was it a factory replacement or upgraded? Thanks again ...I'm kinda scared to do this job myself . Need to buy a press first I see now . But I know I can do it thanks to people who like helping others as yourself great job and great narration! Or what ever you call it !
ReplyDeleteHow long did this job take you?
ReplyDeleteI know your most likely not going to answer but did you have the turbos balanced after the rebuild/ new wheel install or no and did you have any issues if you did not have them balanced? I'm about to pull my turbos and there are no places around to balance and I really don't want to ship them out.
ReplyDeleteI bought the turbo cartridge, so it was already balanced from the factory.
Delete