Wednesday, June 18, 2014

Hey! That's not fair! SmartShield 360 review

I'm going to review the SmartShield 360 Plug-in.

This is a $299 "EMF protection" product I haven't bought, and have no plans on buying. Not fair? Oh yeah? Scamming people out of their hard-earned money isn't fair. 

There's a lot of talk among the alternative health community about EMF. In my opinion, there is a lot of unjustified fear and misinformation going around. 


How it works

Here's what I gathered from their web site. It creates a multi-frequency signal that's fed back into the power lines that it's plugged into. They say "a high level pulse sent through wiring". I guess they're trying to use the household wiring as an antenna. This isn't the first device to use household wiring for communication.

It turns on for 3 seconds, then off for 30 seconds, repeating this cycle.

Claims

They say it's designed for use with Smart Meters and wi-fi. I've heard of some wi-fi password stealing devices hidden in small appliances, so this claim kind of makes me wonder.

They say that electronics of all kinds has harmful radiation. Yet they claim this piece of electronics has good EMF radiation (in the form of a "torsion field", whatever that is) that heals you. Never mind the fact that most household electromagnetic radiation has a near zero effect on the body. (Hey, if they can make baseless claims based on opinion alone, can't I also?)

Here are their claims from Amazon.com: and their website.
  • SmartShield360 Plug-In Whole House Protection provides the latest, state of the art EMF protection (latest Blushield upgrade!), generating a multi-wave scalar output (torsion field). Greatly assists the body in staying balanced and normalized when exposed to the negative effects of harmful electromagnetic radiation from cell phones, cordless phones, WiFi, smart meters, cell towers, computers, powerlines, and electronics of all kinds.
  • Plug SmartShield360 into the wall in your home or office. Highly effective EMF protection designed for large spaces, business and commercial areas. Provides an 80 meter (260 foot) diameter coverage, covering a total 360 degrees of protection. SmartShield Plug-In is an 'active' device. This is unlike passive (not powered) pendants or stickers which claim to protect you.
  • ABS CASE: High impact ABS (plastic) case. Color: White 4 plug types 100 - 240V Low power consumption Microprocessor controlled Meets EMC EN 50082-1:1992 and EN 50081-1 Meets electrical safety NZ/AS 3100
  • Designed for use with Smart Meters and Wi-Fi (although we do not agree with the use of these devices). 2.4 times stronger than the Blushield Classic Plug-In. Covers 4 times more area than the Classic Plug-In. High level pulse sent through wiring for EMF protection. Ideal for avid gamers. Great for homes and offices where EMF exposure is high. High strength field effect reduces fatigue and EMF symptoms, promotes emotional stability, reduces stress, helps maintain levels of alertness and productivity. Promotes restful sleep.
  • * Buy with confidence - 14 Day Satisfaction Guarantee! (Unit must be returned in original condition with original packaging in tact.) Most people experience positive improvements and some even report symptoms they used to have lessen or completely disappear. SmartShield 360 provide state-of-the-art technology, gentle, harmonious with the body and highly effective. People definitely experience the benefits. However, please be aware the technology is subtle and gentle, benefits are cumulative and felt more over time, rather than immediately (although many people do claim to feel the difference soon after use).
And from their website:
  • Wide-spectrum, natural, bio-compatible frequencies
  • Some or no detox effect
  • High strength field effect
  • Reduces fatigue
  • Reduces EMF symptoms
  • Promotes emotional stability
  • Helps maintain a level of alertness
  • Enables restful sleep
  • Increase energy levels

Analysis

Let's go through these claims.

A multi-wave scalar output? Ok, the same thing can be said about the speaker terminals on the back of your stereo. But why say that's a torsion field? Oh, it's listed as a pseudoscience in Wikipedia. So, this supposed torsion field that travels a billion times faster than the speed of light is somehow supposed to "greatly assist the body in staying balanced and normalized"?

Unless they've figured out how to modulate gravity, I don't know of any other physical phenomenon that travels faster than the speed of light. And if they have, this would not be the product first to market. Hoverboard, maybe?

"Wide-spectrum, natural, bio-compatible frequencies." If that doesn't leave you wondering what that means, you are more enlightened than I.

This little outlet cover does in fact block the outlet so you can't accidentally stick a butter knife in the outlet before removing it. In that way alone, I concede protection from EMF.

They say it covers 80 meters diameter. Most people use radius. But they also claim 60 meters on the same page. They don't give any conditions on the coverage, such as walls, line-of-sight, etc.

If you look at the picture of the back of this device, you can see they made a mistake on the label, which leads me to believe that it wasn't designed by an electrical engineer. It list consumption as 4mAH. First, they got the capitalization wrong. It's mAh, which stands for milliamp hours. But that's for batteries. A plug-in device would list Watts or milliamps (mA), not mAh. 


Commentary

Everything I can find about this product is vague. The website's FAQ and News sections are blank. The testimonials are basically anonymous because they only have two initials, and no names.

There's only one way to block EMF (electromagnetic fields). That's with a conductive barrier, also known as a Faraday shield. http://en.wikipedia.org/wiki/Faraday_cage


Imagine trying to block light in a room with another light. It can't be done. You need something to physically block the light. It's the same with EMF. We have many radio stations at once. You can have a more powerful radio overpower a weaker nearby channel, but it doesn't reduce the EMF of the first station. It just makes it harder to pick up the weaker station without hearing the more powerful one.

I think the price is so high, it's to prevent curious people from buying one to take it apart and see what's inside. I see no justification for the price. 
From what I can deduce about this product, it should cost less than $20. But even then, I'm pretty sure it runs on the placebo effect, despite their claims to the contrary. The price alone should tell you that this company is only interested in collecting your money, and not in helping you.

So, after this, if you're still convinced that it wouldn't hurt to just give it a try, remember that you're putting your trust in someone who is promoting a technology that isn't accepted as real by the scientific community. In order for a technology or science to be accepted, the published work needs to have reproducible results. 

There are no studies referenced on the web site. Only one person's two blood tests were recorded. This is by no means a study. 


"But what about God?", you may ask. You may argue that we can't prove that God exists. That doesn't mean that torsion fields and orgone energy are like belief in God. God is real. God has made a significant difference in the lives of countless people.  Here's how to invite God to work a miracle in your life. Make an unconditional commitment to do the right thing, no matter if you believe in God, or not. Then, with an honest heart, study and learn about God.


You will get better results from God, than you will from using this product. 

Tuesday, June 3, 2014

Filtered, Moderated, and Fake Reviews - Ranting About Online Reviews

I, like many customers, depend on reviews to determine if a product is right for me. But when we sense foul-play in reviews, it can drive us away. We may not shop at a place if we suspect they cherry-pick reviews, or if there are what seem to be fake reviews posted by employees of the company that makes that product.

Customer reviews can even be a good source of technical support, especially when your search engine brings them up when you're trying to find a solution to a problem. But the main reason we write reviews of products is because we are trying to be helpful.

For one example, I bought a microscope camera for work from microscope.com. It worked well and I wanted to post my opinion since there weren't any reviews for that product on their website. So I spent some time and created a very nice review, but I also had a couple complaints.

It's pretty unrealistic to have a 100% positive review on a product that isn't perfect. I submitted the review and they never posted it. So I had to assume that they don't post any reviews that aren't 100% positive. Therefore, I am very hesitant to shop there again. I depend on reviews for an honest opinion of other users' experiences with the product.

So then I bought some stuff from tigerdirect.com. Since I hadn't posted any reviews there before, I was unfamiliar with their operating procedure. I had several of my reviews posted, but my review of the motherboard and CPU still weren't posted, so I posted another review on the CPU. Here it is:


Ok, now I sound like a total dork. How was I to know they'd actually post THAT one!?

Here's what I can tell so far about reviews on tigerdirect.com:
  • The review moderators don't like to read. If you post a lengthy review, it may never get posted. Shorter reviews are approved and posted quickly. The longer a review is, the longer it takes to get posted, if ever. I assume the 1000 character limit is because they know their moderators don't like to read.
  • Good luck editing your review. Trying to change it after it's posted doesn't seem to work. Maybe it's because again, I'm trying to post 1000-character reviews. You've already read 1285 characters on this post so far, so there's only so much information you can cram into 1000 characters.
  • Threats to go shop somewhere else actually elicit a response, but I'm not sure they do anything about your complaint.  
  • They have standards for reviews, but I can't find them posted anywhere on their site. So I'm not sure why my reviews aren't being posted. I don't use any bad language, bad grammar, or personal attacks. I did, however, link to this blog for the X9SRA motherboard review. They haven't posted that one.
  • Checking the box that says send me an email when my review is posted, (wait for it) . . . does nothing.

Update 6/20/2014

So after at least four previous attempts at posting a lengthy review on a computer case, I caught some attitude and wrote this.
Victory at last!

Update 29 December 2016

I saw a computer on bestbuy.com and had never heard of this brand before. I was intrigued by their 4.7 out of 5 star rating with 364 reviews. I was skeptical. It's a computer. It runs Windows. Even if every system they sold had no problems, how do you get 4.7 out of 5 stars? You can't please everybody. Some people are just difficult.

Sorting that computer category on BestBuy by best selling, the BB921 was on top. But the next best seller only had 53 reviews. Nobody else even came close to 364 reviews. There was a 4.4 star Asus with 206 reviews. Hmm. The number of reviews doesn't correlate well with the best selling rank.

Let's do some comparison shopping. So I checked on amazon.com under Electronics > Computers & Accessories > Computers & Tablets > Desktops > Towers.

I found a computer with 4.6 stars and 735 reviews. Ok, so maybe it's possible. Then for the same specs and the best I could find with anywhere close to the same number of reviews was a 4.0 star with 294 reviews. It was a Dell computer.

So maybe the rating is plausible. That means we need to do some verification.

The IBUYPOWER computer on amazon with the most reviews only had 90, and it was 3.7 stars. Note the 24% 1 star reviews. That's telling. Ok, this doesn't match with the BestBuy rating.


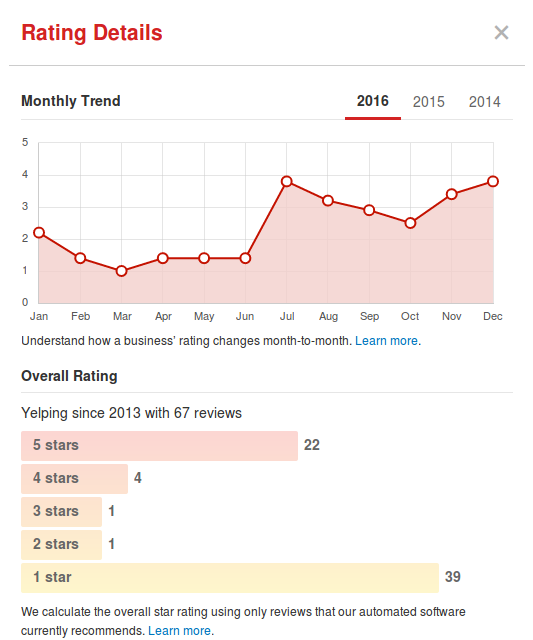
Let's compare reviews from other sources online. Here's what Yelp.com had to say:

Let's skip over that alert and check the rating. Let's see, the majority of their reviews are 1 star. It seems like most people hate this company. And look, it went from 1.4 to 3.8 stars in June. I wonder how that happened.

That doesn't match the BestBuy rating either.

I checked TomsHardware, cnet, and youtube. They really made some customers upset. Several complained about the $99 shipping fee.

Now, here's IBUYPOWER's rating on the Better Business Bureau. They got an F.


Hmm. Really doesn't match the BestBuy rating. Something's suspicious here.

So, if you filter out all the bad reviews, then I can see how you'd get 4.7 out of 5 stars, but 364 reviews? That's funny. When I click to read the reviews, it never loads. I do block some ad sites, so maybe that has something to do with it.


Tuesday, May 20, 2014

Attempting to fix a Sceptre Monitor Power Supply Board

I found what seemed to be a great deal on a computer monitor at the local thrift store. I paid $25 for this 20" flat panel monitor it and brought it home. It worked great for a day or two. Then it started shutting off. I guess that's why it ended up at the thrift store.

Before I bought it, I plugged it in and it powered up with an image on the screen, so I figured it was good to go. I remembered I had a different Sceptre monitor a number of years ago that also died. That should have been my first clue. But lucky for me, there's the internet and I found that the most common problem with these monitors is that the capacitors on the power supply board go bad.

This Sceptre X20G-NagaIII has the same AIVP-0017 power supply board as the infamous Gateway monitors. But this one is rev. E and has a different connector on the side. I found the Gateway rev power supply for sale on ebay for $30, but I've had bad luck un-soldering large connectors, so I figured I'd try repairing it instead of replacing it.
AIVP-0017 after replacing capacitors and removing connectors

So I started doing a visual inspection and didn't see any bulging capacitors. There was a spot on the 12 volt LDO regulator, but it was still functioning. The 12 V and 5 V outputs were fine. So I unsoldered five of the 470 uF capacitors so that I could test them.

Original capacitors:
Brand: SAMXON
Value: 470 uF
Vmax: 25
Tmax: 105 C

My multimeter only measures up to 40 uF, so I just checked for shorts and opens and found no shorts and no opens on any of the five. So I brought them to work and tested them on the HP 4284A LCR meter that I had in my lab. All five had capacitance values between 130 and 170 uF. But I'm not sure if those were good readings.

I ordered some replacement capacitors from Mouser.com and replaced all the 470 uF and the two large 68 uF power supply capacitors. It still had the same problem.

I bet the engineers who designed this power supply are still upset about the poor reliability. Where I work, we make sure that the MOSFETs we sell will have no more than 5 ppm fail after 10 years at the maximum rated gate voltage, near the maximum rated temperature. So, to have a capacitor have the life of a light bulb is totally unacceptable to me.

Since I didn't have a circuit diagram, I decided to give up and order a replacement board. As my luck would have it, the board I got didn't match the picture. The picture was of my board, but the one they sent me was for a Gateway monitor.

I unsoldered the connectors and soldered them on the replacement board. I noticed that my replacement board had some capacitors replaced. They didn't match the originals. It was a "repaired" board. So it was a big disappointment, but not much of a surprise when I turned it on and it had the exact same problem.

Monitor at thrift store $25
Capacitors $15
Replacement board $40

Realizing that some deals are too good to be true . . . priceless.
I may spend a little more time on this project later. If I find the fault, I'll update this post. 

Building an Entry-Level Workstation PC

Have you ever been frustrated with slow computers, or worse, a computer that frequently crashes? I have an old PC at work that regularly crashes after about an hour of use, almost every time. Luckily it's just for a vision module on an Electroglas prober, and I can re-start it when I need it, which can be up to several times a day. I don't know if it's the memory, processor, motherboard, hard drive, or software that's bad.

Have you ever watched General Conference videos where the frame rate was about 1 per second? I know, I shouldn't complain. It wasn't too long ago that we had to wait for a single picture to load. But that was when the internet was the bottleneck. It was time for me to replace my computer (and hand off the old one to someone else in the family). My requirements were that it had to be:
  1. Stable (reliable)
  2. Capable (fast)
  3. Secure (not so vulnerable to viruses or hacking)
  4. Customize-able (which kind of rules-out laptops)
  5. High bang per buck
I looked around and figured that a workstation PC would fit those requirements. It's been almost a decade since I last built a computer. That one was built around an Intel motherboard that I got on clearance on ebay. I think it was about $15. It was the most stable computer I ever owned until it crashed hard a few years ago. The computer I replaced it with was a surplus computer from a going-out-of-business sale. Even though the processor had a faster clock speed, the computer didn't seem any faster. So after a few years of that one, it was finally time to upgrade.

The main reason I wanted to build my own PC was so that I could get exactly what I wanted without having to spend extra money for features I didn't need, or even preferred not to have.

Build Specs


Motherboard
The motherboard is what you start with, to build everything around. I looked for a workstation motherboard that was made for a workstation, not a server. I found the Supermicro X9SRA. It appeared to fit my requirements and my budget. Most of all, it was able to use just about any kind of memory, and had eight slots for memory. With this, I can upgrade without having to remove my old memory modules.

Here are my favorite features on the X9SRA:
  • 8 memory slots
  • Wide range of compatible memory types - almost any DDR3 
  • Uses a Xeon processor (workstation CPU)
  • Nice built-in audio
  • No onboard video so I can choose a video card without paying for a cheap one I won't use
  • RAID support
  • Intel based
I do wish the documentation had more explanation of some features. The user's manual is minimal, at best. It should be called a quick start guide, instead.

The fans are labeled FAN1, FAN2, FAN3, FAN4, and FANA. I emailed customer support and Mark told me that it doesn't matter what fan gets plugged in where. I would think that there should be one dedicated to the CPU to regulate temperature better. But why would one be labeled FANA?

I wanted the variable fan speed feature so that the PC would be quiet when it didn't need to have the fans on high. But there was a problem. The fans would jump to full speed about every 19 seconds, then slow down, repeatedly. Mark at Supermicro customer service emailed me and told me that BIOS version 3.0c lowered the minimum fan speed to about 200 RPM. 

When the computer is turned on, the fans start out on high, then slow down to an idle. If any fan drops below the minimum speed, then it makes all fans speed up like I was seeing.

I downloaded and installed the latest BIOS update, version 3.0c, and that fixed it. Now it's super quiet. The status messages during the BIOS update were slightly confusing. It said success, but wasn't done until several more success messages, and then showed the DOS prompt.

If you use this motherboard, be careful on mounting the motherboard in the case. Make sure that there are no stand-offs where there aren't any mounting holes. I had to move one, and remove another stand-off to match the mounting holes. There are stories in the customer reviews about memory errors because they didn't take out the standoff under the memory, and it was shorting memory pins to ground.

Processor
The most expensive part of my PC was the processor - a six core Intel Xeon E5-2620 v2 processor running at 2.1 GHz. I thought, "only 2.1 GHz?" But don't let that number fool you. It's still plenty fast.

It didn't come with a cooler, so I ordered Intel's standard LGA2011 cooler, part number BXRTS2011AC.

What I didn't realize at the time was that the E5-2600 series processors are designed for dual processor (DP) applications. You can get a motherboard with two 2011 processor sockets and put two of these on it. While it'll run fine on single processor motherboards (UP), it isn't taking full advantage of its dual-processor capabilities. A more cost-effective solution for single processor motherboards is the E5-1600 series. You get the same performance, but save about $100.

If you get the E5-1600 v3 or E5-2600 v3, then make sure your motherboard has the 2011-3 socket, not the plain old 2011 socket.

Case
The case needed to be professional looking, not gamey. I wanted a decent case that had plenty of room inside. And I wanted a case that came without a power supply so I could choose one separately.

I don't see a need to have a clear panel on the side with a bunch of LEDs lighting it up. I guess I kind of like the form-follows-function look. I like understated performance better than looks that can't deliver.

So I decided on the Corsair CC-9011014-WW. I'm pretty happy with it. But there was one draw-back. I wanted 4-pin PWM fans, and this came with two 3-pin fans. The motherboard needs the 4-pin style to regulate the fan speed by temperature. But I like the fact that there is a fan filter in the front of the case. That should keep the dust levels low inside the case.

Power Supply
The power supply needed to have plenty of reserve power, and also be efficient. That's why I chose the Corsair AX760. As a bonus, it's fully modular, meaning unneeded cables can un-plug from the power supply and be stored elsewhere.

The cooling fan doesn't need to even turn on until the system load reaches 70%. I assume that means 70% of 760 W, or about 530 W. If that's correct, this fan may never turn on, and never fail. At 70% load, the power supply is about 91% efficient, and only dissipates 48 W while delivering 530 W.

The whole system appears to be extremely efficient. My AC current meter says the computer (without peripherals) only  draws 0.57A as I type this. At 122V on the wall, that's only about 70 Watts total!

Storage (Hard Drives)
Since hard disk drives can really slow down a computer, I decided to go with solid state drives. Sometimes drives fail. It's time-consuming to make full backups or do a restore. If a drive crashed, I just wanted to be able to continue normally. RAID gives me that option.

I picked two 240 GB SSDs made by Seagate. Unfortunately, I didn't think ahead about mounting the 2.5" drives in a 3.5" bay, and had to order this mounting bracket later. The power supply cables can't be mounted that close to each other, so I have the drives facing opposite directions in the mounting bracket. Only later I found out that the case already had holes to mount 2.5" drives in the 3.5" trays.

I made a mistake on setting up the RAID volume. I first loaded my operating system, complete with all the latest updates. Then I tried to set up RAID afterwards. When I finally noticed the RAID menu during boot-up (after I enabled RAID in the BIOS), I already had the operating system set up. When I set up the RAID volume in mode 1 (mirror: stores the same data on two drives), the computer said it would erase all data on my hard drive. So I got the experience of installing the operating system again. 

Video Card
I'm not much into gaming. But I do like reasonably good video frame rates for youtube, etc. I may use some CAD software. A workstation graphics card fit the workstation theme, so I chose an NVIDIA Quadro K600. I like the fact that it supports two monitors. After experiencing two monitors at once, I really like it. It's like doubling the work area of your desk.

The K600 came with two adapters - one that converts the DisplayPort to DVI, and a DVI to VGA converter. But you can't connect the DVI to VGA converter into the DisplayPort to DVI converter. Also, the DVI to VGA converter doesn't allow some monitors like the Samsung T24C550ND to run in full 1920x1080 resolution. I had to get a different DVI to VGA converter to get it to work with full resolution.

The two DVI connectors are different and won't fit together. So you can only run a VGA monitor on the DVI port, not the DisplayPort output. I haven't tried a different adapter for this purpose though.

It came with the low-profile mounting bracket pre-installed, and the standard size bracket in the box, so I switched them so it would fit my case.

There are faster gaming video cards out there for the same price, but I figured if I installed a CAD program, it might require features present on a workstation video card. A gaming card emphasizes frame rate over rendering accuracy. A workstation card emphasizes accuracy over frame rate. 

Memory
I wanted more than the 4 GB I had, but didn't want to go high on the budget. Since the motherboard can accept more of the same, I got two 4 GB sticks of registered ECC RAM from Crucial, part number CT2K4G3ERSLS41339.  I was hoping to get LRDIMMs, but the price was still too high, so I settled for 8 GB registered ECC RAM.

I wanted the registered, ECC memory so that I hopefully won't have problems with memory errors. Who knows how many bits got flipped because a memory cell got hit with a gamma ray from a decomposing radon atom? 

Operating System
It goes without saying, if you have a PC, you run Windows, right? Not this time. I sometimes like to do things differently. It's kind of like a challenge to see if I can live without Windows. So far, so good. I may even install and run some Windows programs on an emulator, but only if I can't find a Linux version first. 

Fans
The motherboard supports 4-pin fans for variable speed control. I ordered three Bitfenix Spectre Pro PWM fans: two 140mm intake fans, and one 120mm exhaust fan. (Also there's an Intel 4-pin fan that's mounted to the CPU heatsink.)

Update Jan 14, 2017: The computer spent most of its time on, so the fans were running on low speed most of the time. The 120 mm fan was starting to make noise, so I replaced it. The 140 mm fans could no longer stay over 300 RPM at idle. One 140 mm fan failed. It wasn't a bearing. The motor started wearing out and the computer would raise the speed of all fans if one dropped below 300 RPM. So basically, all three Bitfenix fans wore out in less than three years. But they did last longer than their 12 month warranty.

A while ago, I added a copper chipset cooler with a tiny 4 pin PWM fan. That keeps it cool.

Performance Benchmarks

CPU Blowfish 1.509 s
CPU Cryptohash 837.84 MiB/s
CPU Fibonacci 1.76 s
CPU N-Queens 0.63 s
FPU FFT 1.14 s
FPU Raytracing 4.81 s

I ran these with the power profile in BIOS set to efficient. I made no attempt at over-clocking. I don't want to run anything too hot. The benchmarks reported that the CPU was running at 1200 MHz. I have no idea why.

Graphics card benchmarks

Video Card glmark2 score
Quadro K600 2047
GTX 960 6529
R9 270 2532


If you want to run the same benchmarks for comparison, install Hardinfo on Linux. If you're not running Linux, you can download a CD image, burn it, and boot off the CD to run what they call a "live session". You can install Linux Mint Hardinfo from the software center, but it's not permanently installed in a live session. The video card benchmarks were done with glmark2.

I didn't want to pay to get the 64 bit Geekbench software, so I just ran the 32 bit version for Linux. Geekbench (32 bit) score = 12364.

Cost
Yes, that's the big question. Here's the itemized list.

Motherboard 281.90
CPU 404.75
CPU cooler 21.26
Case 79.99
Power supply 179.99
Drives 119.99 x2
Drive bracket 9.99
Video card 169.99
Memory 113.99
Fan 120mm 12.99
Fan 140mm 16.99 x2

Total (without tax or shipping): $1548.81

So, was it worth it? I'm not sure. By that, I mean I could probably get by with something cheaper, but it sure is nice to have a tool that works. Also, it was fun to build.
Inside the workstation PC (still needs some cable clean-up)


Saturday, April 26, 2014

Unlocking a Possessive Camry

Only about two or three days passed since I repaired the clutch fork in the 1996 Subaru. Then the fuel pump died. Sigh. So we borrowed a car from a friend. It was a 2002 Toyota Camry. They didn't tell us about this little quirk it had. It seems the car is a little possessive. I'm not sure if it liked me or just wanted to toy with me, but it locked me in the car. That's just my luck. I borrow a car and it breaks on me.

The driver's side door wouldn't unlock. It wouldn't unlock from the inside or the outside. It's supposed to unlock when you pull on the inside handle. I tried turning the key and pulling the lock lever at the same time. I tried moving the handle and the lock different ways. I even tried pulling on the handle and turning the key at the same time. I pulled the inside handle and the outside handle. I turned the key back and forth while pulling on the inside handle. It was jammed.

There was no problem with any of the electric locks. The lock cylinder was functioning correctly. The linkage for the inside handle and lock lever were functioning correctly. The actuators were working on all the doors, except it wouldn't unlock the driver's door. I could turn the key to unlock twice and all the other doors would unlock, but the driver's door was stuck locked. The problem was inside the lock/latch unit.

To replace any parts, I needed to get the door handle off. There was just one problem. I couldn't get the door panel off without first opening the door. So I rolled down the window and took a look inside the door. It's a narrow gap, but with a flashlight and a small inspection mirror, I could see most of what I needed to. One of the clips for the outside handle was not connected properly. I clipped it back on the rod, but that wasn't the problem.

I said a little prayer and decided to try again. I tried the key and the inside lock lever at the same time again. Then I got a crazy idea. I turned the key the other way, to lock the door. I wanted to see what would happen if I pulled on the lock lever to try unlocking it as I released the key from the fully locked position to the unlock position. It actually popped unlocked. Yay! I squirted some WD-40 on the door latch and where the rod from the lock cylinder goes, some WD-40 in the lock cylinder, and even some WD-40 in the ignition lock cylinder so it would move freely too. Ok, I was getting a little carried away with the WD-40.

I have no idea what went wrong, but you can probably bet this will happen again. At least I'll have an idea of how to get in there if we need to replace the latch assembly in the future. And maybe if your Camry locks you in, you can try what I did. Maybe it will work for you too. I also found a really helpful video on how to take the door panel off: https://www.youtube.com/watch?v=3o05U4Qn5pQ


Saturday, April 19, 2014

How Do You Break a Clutch Fork?

I have no idea. Maybe my daughter has some ideas. Just kidding. She just happened to be driving it when it broke - both times. Wait, I'm seeing a pattern here. Nah, it's probably nothing.

Today marks the second time I replaced the clutch fork on my 1996 Subaru Legacy Outback. Previously, my son and I took the transmission out once to change the clutch, once to fix the oil leak on that plate under the flywheel, and once to replace the clutch fork. Not wanting to take the transmission out again, this time I got an engine hoist and lifted the engine up and forward to separate it just enough to get the new clutch fork in.

We supported the transmission with a jack so that it wouldn't fall down after separating the engine and transmission. I don't know if this way was any easier. Maybe it was a little easier. But I still had to disconnect both half-shafts from the transmission to get access to the nuts that held the transmission on the engine.

The pivot ball under the clutch fork looks a little worn. I don't know, but maybe it could be the cause of the clutch fork wearing out early. But I suspect the clutch forks are either a little under-engineered, or have cracks from the factory. I'm not the only one to have the clutch fork fail. But I haven't seen people complaining of them breaking again in a year. Hopefully a little caliper lube on the pivot ball will keep this one lasting more than a year.

Here's a picture of the first two broken clutch forks, and the new one that I put in today. I still had the original one in my scrap metal bin.

Original clutch fork, 1st replacement, and new one that went in today.
When the second one broke, my daughter couldn't get the car into gear because the clutch wouldn't fully disengage. So I told her to put it in 2nd gear, start it in gear, and then just drive home in 2nd. That worked.

I'm selling this car to my son next month. And he's happy to buy it.

Update November 29, 2014. The last clutch fork lasted seven months. It broke again and we had to replace it again. 

Sunday, March 16, 2014

Minivans, Marriage, and Connecting Rods

What do marriage and minivans have in common? It's all about keeping the wife happy. I'll explain later.

We had a rod bearing fail on our 2003 Dodge Caravan 3.8L V6. The engine started making a bad knocking sound.

I removed the oil pan and wiggled the connecting rods to see which was the loosest. It was the fourth from the front of the engine. I pulled the cap off the rod bearing and saw that the bearing had spun. The cap doesn't just pull off. After removing the nuts, you have to tap on the bolts to separate the connecting rod from the cap.

Here's what the spun bearing looked like. Notice the wear on both the inside and outside surfaces.

The rod bearing should not rotate within the connecting rod. It is clamped in place with pressure from the connecting rod bolts. It has holes that need to line up with oil passageways. When a rod bearing spins, the hole in the center no longer lines up with the oil passageway and then oil can't squirt on the underside of the piston.

When I pulled out the spun bearing, the oil pickup tube screen had a lot of metal shavings in it. There were shavings in the bottom of the oil pan too.

Although the rod bearing is called a bearing, it's actually only half of the bearing. The other half is the crankshaft surface, called a journal. I tried to replace the bearing to see if it would work. The journal didn't look too bad, so I put a new bearing in to see if it would work.

The Chilton manual for the older model 3.8 engines says to tighten the rod nuts to 40 foot pounds plus another 90 degree turn. I really don't like that way of tightening. I don't want to over-stretch the connecting rod bolts. If they were new, I'd do that, but re-using them is different, and the book torque specs don't take into account re-using rod bolts. So I torqued them to 40 foot pounds and stopped at 50 before I went another 90 degrees. 

After a day's errands, the rod was knocking again.

Here's what the replacement bearing looked like. This time, it didn't spin, but the journal was not smooth enough to prevent it from wearing.

For comparison, here's what the number 1 cylinder's rod bearing looks like after 130,000 miles.

So, I figured I'd just smooth out the journal surface and try again. So I got out some metal polishing compound, wrapped a cloth strip one and a half times around the journal and got the surface smoother. Well, it still wasn't enough. The surface needs to be absolutely flat and polished for the bearing to ride on a cushion of pressurized oil. The bearings don't rub on each other in normal operation. The oil provides a cushion that prevents the bearing from contacting the journal.

I haven't taken the second replacement bearing out yet. Here are my options:
  1. Replace the crankshaft. It comes with rod and main bearings. $157 + $75 core + $8 for the timing cover gasket set + oil and oil filter. That's if I do it myself. This may or may not be a great idea. If the oil loss was due to worn piston rings, I would have to eventually replace the engine anyway. Also, if there was any damage to the wrist pin from a lack of lubrication due to the spun rod bearing, that would be cause for engine replacement too. At a minimum, I would have to remove the transmission, ring gear, crank pulley, timing cover, and oil pan to get the crankshaft out.
  2. Replace the engine. $1880 + $360 core. I'd need time and patience for this job too, and a good supply of nitrile gloves and shop towels. 
  3. Cut my losses and sell the van as is. Blue book value is from $3600 to $5300. I'd have to subtract $2000 for the engine, plus $500 for installation, and $500 for the hassle factor. So I'm looking at a $2300 selling price, with negotiation possible down to $600. However, this option comes with consequences. First, my wife loves this van. Second, her parents gave it to her. I'd be suffering unimaginably by selling it. The repercussions of selling it would be more painful than the blood, sweat, and tears expended by swapping engines.
  4. Let the van sit in the back yard. This would work for a little while. But eventually, it would only be slightly less painful than option 3. That is, unless I buy another used car that she absolutely loves. Then she may be willing to sell it after getting tired of seeing it sit there.
  5. Invent a way to machine the journal down 0.010" with the crank still in the engine. Then just buy a 0.010" undersized bearing, put it in and go. While I may impress my wife with my ingenuity and tenacity, I'll lose points for development costs and time. But then, if I could market this tool for $100 or less, then it may . . . never mind. This isn't going to happen. Wives may smile and nod at your dreams, but they also know your track record on following through. 
  6. Install a junk-yard engine. Let's not go there. It's high risk. 
It looks like my best option is a new engine. That way, it'll work for sure. Then the transmission will quit. That's just my luck.