Thursday, August 20, 2015
Obnoxious Password Rules
We've all seen password rules, and most likely been annoyed by them. They think they're doing us a favor by requiring a highly secure password. But freedom is better. The more password rules they have, the less secure the password is because it's harder to remember, and it has to be written down, in its entirety. It can be so easily forgotten that you have to use the forgot password link and have a temporary one emailed. And email isn't very secure.
Can you imagine having to remember a password like this? &#p>b2"D8%u>w+\{6
On August 14th, I tried to login to my.t-mobile.com and was redirected to a page where I was required to change my password to a more secure one. I tried one of my usual passwords, and all the check marks turned green, so I figured it was good. So I clicked the button. No good. I tried several new passwords that appeared to satisfy the password auditor, but they still didn't pass their new, hidden stringent quality standards auditor, so I made up a stupidly complex password with absolutely no words found in the English dictionary. That appeared to be the problem with my other attempts. They included words found in the dictionary.
This new password had 16 characters, upper and lower case letters, numbers, and symbols. It looked like the gibberish that would appear on the screen when you tried to open an executable file in notepad. Finally, their algorithm appeared to accept my new password. But, since their server was "experiencing problems", I couldn't make it all the way through the password changing process. I didn't know if I should use my new or old password to log in.
I tried logging in with my new password, then my old password, but somehow went over the number of attempted login re-tries and got locked out for 24 hours. They had an option to "click here" and email me a temporary password. I tried, but of course, the server was "experiencing problems". Could it be that the overly stringent password requirements backfired? I was imagining thousands of frustrated T-mobile customers cursing their website, unable to pay their bills.

Saturday, August 15, 2015
Replacing the timing chain on my 1999 Cougar 2.5L V6
I count it as a blessing that the engine didn't fail. It was close, and it could have had the timing chain fail at any time. It wasn't making noise (aside from the rattle at start-up), so I figured it was okay to drive the car to the airport and back before changing the timing set. My wife advised against it, but I figured it would be ok. She was right, but thankfully not so right that the car didn't make it.
Since I found the timing chain guide fragments in the oil pan, it was only logical to replace the entire timing set.
After removing the cover, I rotated the engine counter-clockwise and it made the left side timing chain very loose. The tensioner didn't keep tension on it in this situation. Here, I can lift the chain off the guide and shake it. The left side (front of car side) timing chain had actually skipped a couple teeth. This explains the loss of power. Getting blocked by trucks passing from behind you when you're trying to merge into traffic gets old really fast.

Check out how worn the old guide is compared to the new one. This was all because it was missing the plastic piece. Without that plastic piece, the chain just tore into the aluminum.
Since the chain was so loose, it somehow rubbed on the oil pump. It looks fine still, so I'm not going to replace it this time. (The oil pump is on the bottom half of the picture, with the crankshaft protruding out from the center of it.)
After doing this job, I can tell you that if the oil pump ever needs to be replaced on this car, it'll be more than the oil pump needing replacing. There's no oil pressure gauge. That means that if the oil pressure light comes on steady while driving, it would probably mean "you need a new car". But it may also be repairable. You could start by taking out the radio, then you have a big pile of used parts that you roll out of the driveway. Drive another assembly of parts (commonly called a car) into the same space, re-install the stereo, and you're good to go.
Not only had one guide completely failed, the remaining three guides all had fragments broken off. They were barely hanging on.
So, to prevent the plastic from coming off the new guides, I glued the plastic pieces on all four new guides with black RTV silicone. I wonder why the engineers didn't implement something like that in the first place.
I find it puzzling that they warn us to never rotate the engine counter-clockwise, but this can happen a little bit every time you shut off the engine. Also, what happens when you stall the engine when you're trying to start on a steep incline? These things happen, and the manufacturer can't just assume that the engine won't ever rotate backwards during every-day use.
The plastic timing chain guides had a small clip to keep them from sliding off, but they look like a backwards rotation could easily dislodge them and break pieces off as I saw on my engine.
After installing the left side chain, and counting and re-counting links to be absolutely sure it was timed correctly, I noticed that the other chain had black links for aligning with the timing marks. Oh, how easier the first chain would have been if I had seen those. Oh well. The left side chain is either on backwards, or doesn't have marked links.
I got confused on how they counted the links. The literature says that there are ten links between the timing marks on the intake and exhaust cams. I took that a little too literally. There are ten whole links if you put the marked link over the mark, instead of putting the mark between the links. If you line the marks up between the links then it's 11 links between the two cams, and 24 instead of 23 from the cam to crank mark.
If someone ever takes this engine apart, they may wonder how in the world the chain skipped a tooth on all three sprockets, yet remained exactly in time.
So if you have a marked chain, then put the marked links directly over the timing marks, and count the unmarked links between the marked links and you should end up with 10 links between cams, and 23 between cam and crank on the non-tensioned side. That goes for both chains.
One thing I learned on this job was that there's a special way to rotate the cams to neutral. At cylinder 1, TDC of the compression stroke, the left side chain's cams are in the neutral position. Remember, left side chains are on the right if you're facing them. Let me explain. No, there's too much. I'll just summarize. Left is in reference to the left side of the engine as you sit in the driver's seat in a traditional rear-wheel drive vehicle.
If you then rotate the crank clockwise from TDC so that the crankshaft key is in the 3 o'clock position, then the right side cams (your left . . . towards the rear of the car) are in the neutral position. If you try to install the second chain with cylinder 1 at TDC, you may have the cams snap-turn and pinch your thumb. It's okay. My thumb is fine now. Oh, and 3 o'clock is as you're facing the front of the engine. The front of the engine is on the passenger side of the car, in this case.
The car is running better now. Before the repair, it would lose power above about 5200 RPM. I mentioned that to my son after he borrowed the car, and he said "yeah, I noticed."
Of course.
Now it pulls all the way up to 6500 RPMs. I didn't go all the way up to the rev limiter, and it definitely accelerates faster than before.
Since I found the timing chain guide fragments in the oil pan, it was only logical to replace the entire timing set.
 |
| 1999 Cougar 2.5L V6 DOHC, showing both timing chains |
After removing the cover, I rotated the engine counter-clockwise and it made the left side timing chain very loose. The tensioner didn't keep tension on it in this situation. Here, I can lift the chain off the guide and shake it. The left side (front of car side) timing chain had actually skipped a couple teeth. This explains the loss of power. Getting blocked by trucks passing from behind you when you're trying to merge into traffic gets old really fast.

Check out how worn the old guide is compared to the new one. This was all because it was missing the plastic piece. Without that plastic piece, the chain just tore into the aluminum.
 | |||
| Old and new timing chain guide, without the plastic piece attached |
 |
| Old timing chain guide that lost the plastic piece |
Since the chain was so loose, it somehow rubbed on the oil pump. It looks fine still, so I'm not going to replace it this time. (The oil pump is on the bottom half of the picture, with the crankshaft protruding out from the center of it.)
 |
| Oil pump housing damage |
After doing this job, I can tell you that if the oil pump ever needs to be replaced on this car, it'll be more than the oil pump needing replacing. There's no oil pressure gauge. That means that if the oil pressure light comes on steady while driving, it would probably mean "you need a new car". But it may also be repairable. You could start by taking out the radio, then you have a big pile of used parts that you roll out of the driveway. Drive another assembly of parts (commonly called a car) into the same space, re-install the stereo, and you're good to go.
Not only had one guide completely failed, the remaining three guides all had fragments broken off. They were barely hanging on.
 |
| Broken chain guide, barely hanging on |
So, to prevent the plastic from coming off the new guides, I glued the plastic pieces on all four new guides with black RTV silicone. I wonder why the engineers didn't implement something like that in the first place.
 |
| Glueing the timing chain guides together |
I find it puzzling that they warn us to never rotate the engine counter-clockwise, but this can happen a little bit every time you shut off the engine. Also, what happens when you stall the engine when you're trying to start on a steep incline? These things happen, and the manufacturer can't just assume that the engine won't ever rotate backwards during every-day use.
The plastic timing chain guides had a small clip to keep them from sliding off, but they look like a backwards rotation could easily dislodge them and break pieces off as I saw on my engine.
After installing the left side chain, and counting and re-counting links to be absolutely sure it was timed correctly, I noticed that the other chain had black links for aligning with the timing marks. Oh, how easier the first chain would have been if I had seen those. Oh well. The left side chain is either on backwards, or doesn't have marked links.
I got confused on how they counted the links. The literature says that there are ten links between the timing marks on the intake and exhaust cams. I took that a little too literally. There are ten whole links if you put the marked link over the mark, instead of putting the mark between the links. If you line the marks up between the links then it's 11 links between the two cams, and 24 instead of 23 from the cam to crank mark.
If someone ever takes this engine apart, they may wonder how in the world the chain skipped a tooth on all three sprockets, yet remained exactly in time.
So if you have a marked chain, then put the marked links directly over the timing marks, and count the unmarked links between the marked links and you should end up with 10 links between cams, and 23 between cam and crank on the non-tensioned side. That goes for both chains.
One thing I learned on this job was that there's a special way to rotate the cams to neutral. At cylinder 1, TDC of the compression stroke, the left side chain's cams are in the neutral position. Remember, left side chains are on the right if you're facing them. Let me explain. No, there's too much. I'll just summarize. Left is in reference to the left side of the engine as you sit in the driver's seat in a traditional rear-wheel drive vehicle.
If you then rotate the crank clockwise from TDC so that the crankshaft key is in the 3 o'clock position, then the right side cams (your left . . . towards the rear of the car) are in the neutral position. If you try to install the second chain with cylinder 1 at TDC, you may have the cams snap-turn and pinch your thumb. It's okay. My thumb is fine now. Oh, and 3 o'clock is as you're facing the front of the engine. The front of the engine is on the passenger side of the car, in this case.
The car is running better now. Before the repair, it would lose power above about 5200 RPM. I mentioned that to my son after he borrowed the car, and he said "yeah, I noticed."
Of course.
Now it pulls all the way up to 6500 RPMs. I didn't go all the way up to the rev limiter, and it definitely accelerates faster than before.
Update 22 May 2017
The left timing chain tensioner failed. The product was Engine Tech brand and only had a 12 month 12,000 mile warranty. It's been almost two years since I installed it. Here's the link to that blog entry.Wednesday, July 29, 2015
What's the biggest part you've ever found in an oil pan?
The 1999 Mercury Cougar 2.5L V6 has been leaking oil since I got it last fall. I tried changing the timing cover seal for the crankshaft. That wasn't leaking much. I rebuilt the power steering pump. That wasn't the biggest leak. It looked like the oil pan gasket was leaking, so I decided to change that. If it's still leaking, then the timing cover gasket better be it.
The engine used to make a bad chattering noise when I started it until it built up oil pressure. I didn't know what it was, but then one day, the noise went away. That should have been a clue that something bad happened. Cars don't just fix themselves. If the noise went away, then something probably fell off, or broke.
When I took the oil pan off, the oil pump pickup screen was cram packed with debris. Again, not good. That was restricting oil flow. In the oil pan, I found some sizeable chunks of what looked like a timing chain guide.
So without that plastic piece, the timing chain has been rubbing on metal instead of plastic. That's not good. The oil had a brassy metallic color to it when I drained it.
There's a baffle in the bottom of the oil pan that I removed to get the rest of the chunks out.
Without the plastic piece on the timing chain guide, it will change the timing of the camshafts on that bank. The OBD-II scanner also showed a long term fuel trim difference between bank 1 and bank 2. That means there's an air flow difference between the two banks. So this was the cause of at least some of the missing horsepower.
The engine used to make a bad chattering noise when I started it until it built up oil pressure. I didn't know what it was, but then one day, the noise went away. That should have been a clue that something bad happened. Cars don't just fix themselves. If the noise went away, then something probably fell off, or broke.
When I took the oil pan off, the oil pump pickup screen was cram packed with debris. Again, not good. That was restricting oil flow. In the oil pan, I found some sizeable chunks of what looked like a timing chain guide.
 |
| Timing chain guide chunks |
So without that plastic piece, the timing chain has been rubbing on metal instead of plastic. That's not good. The oil had a brassy metallic color to it when I drained it.
There's a baffle in the bottom of the oil pan that I removed to get the rest of the chunks out.
 |
| 1999 Cougar 2.5L oil pan, inside view |
 |
| Oil pickup tube and screen, cleaned out |
 |
| Bottom of engine, oil pan removed |
 |
| Timing chain, looking from the bottom of the engine |
Monday, July 6, 2015
H19txt Disassembly
I was moving a cabinet on a hand-truck when it fell off and I tried to catch it. My earpiece was in my pocket when I tried to catch the cabinet, and the earpiece got squashed. It still works, but the microphone no longer picks up sound well enough to hear.
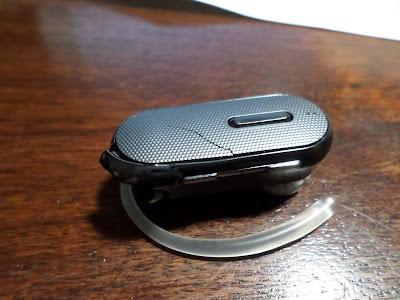
So, for the sake of sharing, I decided to disassemble the H19txt. It was already broken, so any further damage wouldn't matter to me. Obviously, I'm not responsible for any damage caused by following the same procedure I list here.
First I removed the top gray cover. If you use a sharp knife and pry it towards the center, it should release the clips and pop off.

Next, remove the plastic trim by prying away from the body. These two pieces were already damaged from being squashed between my thigh and a falling cabinet.


The flip easily comes off by prying the clips wider. One end fits over a square side that activates a switch on the circuit board. The other end is rounded. It's the same basic style as the H17. I broke the flip on my H17 and ordered a replacement. The replacement was the H19 style. The replacement didn't have the rubber bumper on it that made it close softly. That's one feature from the H17 that I like better than the H19txt.

The circuit board can be removed by first prying up on the USB connector end. Then carefully slide it towards the USB end of the earpiece.

Underneath the circuit board, we can see the lithium ion cell. It is taped in, and can be removed by prying it out.


For my replacement H19txt, the first thing to do is to hold the call button down when opening the flip to get to the settings menu. I turn off the voice prompts so that it takes less time from turning on to being able to talk when I answer the phone.
So, if you have an H19txt and want to replace the battery or something, I hope this helps.

So, for the sake of sharing, I decided to disassemble the H19txt. It was already broken, so any further damage wouldn't matter to me. Obviously, I'm not responsible for any damage caused by following the same procedure I list here.
First I removed the top gray cover. If you use a sharp knife and pry it towards the center, it should release the clips and pop off.

Next, remove the plastic trim by prying away from the body. These two pieces were already damaged from being squashed between my thigh and a falling cabinet.


The flip easily comes off by prying the clips wider. One end fits over a square side that activates a switch on the circuit board. The other end is rounded. It's the same basic style as the H17. I broke the flip on my H17 and ordered a replacement. The replacement was the H19 style. The replacement didn't have the rubber bumper on it that made it close softly. That's one feature from the H17 that I like better than the H19txt.

The circuit board can be removed by first prying up on the USB connector end. Then carefully slide it towards the USB end of the earpiece.

Underneath the circuit board, we can see the lithium ion cell. It is taped in, and can be removed by prying it out.


For my replacement H19txt, the first thing to do is to hold the call button down when opening the flip to get to the settings menu. I turn off the voice prompts so that it takes less time from turning on to being able to talk when I answer the phone.
So, if you have an H19txt and want to replace the battery or something, I hope this helps.
Monday, June 8, 2015
Fixing buzzing H19txt bluetooth earpiece
After a year or so of using my H19txt, it started buzzing like something was on the speaker. I thought the speaker may have either been torn, or my ear hair was poking into the speaker.
After a little testing, I determined that my ear hair was definitely not poking into the speaker. So I decided to peel off the speaker grille. There wasn't much to lose at this point if I broke it. Luckily, it was attached with foam tape. Here's a picture of the earpiece with the grille removed.
 You can see the black double-sided foam tape on the back of the speaker grille. There is a bunch of pocket lint, skin cells, and maybe even some ear wax built up on the screen over the speaker. Since I had a microscope handy, I took a picture of it.
 After a little cleaning, the screen looks better.
 Amazingly, after pressing the grille back on, the buzzing sound was gone.
I also went through the menu and turned off the voice interface. (To get to the menu, hold the call button down as you open the flip.) So now when I turn it on, it just beeps instead of saying "Phone one connected . . . More than eight hours of talk time." If I get a call and it's in my pocket, I can open the flip and put it on my ear and start talking sooner instead of waiting for it to get done saying "phone one connected".
After a little testing, I determined that my ear hair was definitely not poking into the speaker. So I decided to peel off the speaker grille. There wasn't much to lose at this point if I broke it. Luckily, it was attached with foam tape. Here's a picture of the earpiece with the grille removed.


I also went through the menu and turned off the voice interface. (To get to the menu, hold the call button down as you open the flip.) So now when I turn it on, it just beeps instead of saying "Phone one connected . . . More than eight hours of talk time." If I get a call and it's in my pocket, I can open the flip and put it on my ear and start talking sooner instead of waiting for it to get done saying "phone one connected".
Wednesday, May 20, 2015
Dude, Where's my PC?
If you've ever had a PC or laptop stolen, lost, or knew someone who had that happen to them and wished there was an easy way to track it down, this may help.
It will work on Windows systems if you install Linux as a dual-boot option. It will default boot to Linux. Password protect Windows so that the "user" is forced to only use the Linux OS. You can have Linux boot without requiring a password login. This will keep the new "user" busy while your computer is phoning home. Just don't write the super-user password down on your computer.
If you have the public IP address, you can get a close physical location, but probably not close enough to matter. However, if you also have a list of the nearby wifi networks and signal strengths, you can pinpoint the location pretty accurately if you know some trigonometry. See? This is one good reason to pay attention in math class.
It may take some roaming around from the IP address's stated location before you find one of the networks, but in theory it should be possible to locate the missing PC.
Here are the steps.
1. Backup your PC. You know, just in case you accidentally have it install Linux by erasing your Windows installation.
2. Install a linux operating system if you don't have one already. Choose dual-boot if you wish to keep Windows.
Prevent the new "user" from easily re-installing the operating system:
3. In BIOS, set the boot order to boot to the hard drive only.
4. Password protect BIOS so step #1 can't be changed without the password.
5. If you'd like to be able to remotely log-in to the PC if you knew its IP address, install openssh-server.
sudo apt-get install openssh-server
6. Enable your PC to email you by setting up mail:
sudo apt-get install ssmtp
sudo apt-get install mailutils
If you have gmail, you have to change your google account setting to allow access from less secure apps, otherwise it will block your PC's login attempt. If you forget to do this, you'll get an email that will tell you that google blocked a login attempt.
7. Edit the mail configuration file
sudo gedit /etc/ssmtp/ssmtp.conf
# Example file /etc/ssmtp/ssmtp.conf ---------------------------------------------------
# Config file for sSMTP sendmail
#
# The person who gets all mail for userids < 1000
# Make this empty to disable rewriting.
root=your.email.address@gmail.com
# The place where the mail goes. The actual machine name is required no
# MX records are consulted. Commonly mailhosts are named mail.domain.com
mailhub=smtp.gmail.com:587
AuthUser=your.email.address@gmail.com
AuthPass=your.gmail.password
UseTLS=YES
UseSTARTTLS=YES
# Where will the mail seem to come from?
#rewriteDomain=
# The full hostname
hostname=gmail.com
# Are users allowed to set their own From: address?
# YES - Allow the user to specify their own From: address
# NO - Use the system generated From: address
FromLineOverride=YES
# end of file --------------------------------------------------------------------------------------------
8. Change permissions on the email config file so that a non-superuser can't view its contents. We want to hide the ssmtp.conf file from non-superusers because it contains the password for your email.
sudo chmod 600 /etc/ssmtp/ssmtp.conf
9. Install curl so we can get the public IP address the computer is using.
sudo apt-get install curl
10. Create a script. We'll show you an example in a bit. In order to run every day that the PC is powered on, copy your script to the directory: /etc/cron.daily/
Make sure the name of your script does not have an extension, or else it won't run. If you name it checkin.sh, thinking it'll work because some shell scripts end in .sh and it even runs from the command line, it still won't run automatically.
Here's an example script that will email you the public IP address and the surrounding wifi network names and signal strengths.
#!/bin/bash
#
# Get public IP address and save it in ~/.locality at the end of the file.
# Save only the IP address to the file, and error output to the bit bucket.
curl ident.me > ~/.locality 2>>/dev/null
# Get the location of the ip address that's saved in the file .locality and dump the error in the bit bucket.
curl ipinfo.io/<~/.locality >> ~/.locality 2>>/dev/null
# Check if I'm superuser. It should be, if it runs automatically.
if [[ $(id -u) -eq 0 ]]; then
echo "" >> ~/.locality
echo "Superuser" >> ~/.locality
echo "" >> ~/.locality
else
echo "" >> ~/.locality
echo "Regular user" >> ~/.locality
echo "" >> ~/.locality
fi
# Scan for wireless networks and save to the same file. Send errors to the bit bucket.
# must be superuser to run this command.
iw dev wlan0 scan >> ~/.locality 2>>/dev/null
# Email
# Subject
SUBJECT="My PC location"
# To
TO_EMAIL="your.email.address@gmail.com"
# Message
# Sending email using /bin/mail
mail -s "$SUBJECT" "$TO_EMAIL" < ~/.locality
# Delete the .locality file.
rm ~/.locality
# end of script checkin ---------------------------------------------------------
11. Hide the contents of your script from regular users, but allow them to run it, because, you know, another email confirmation is great.
sudo chmod 711 /etc/cron.daily/checkin
xmodulo.com/how-to-find-the-public-ip-address-from-command-line.html
How to find the geographic location of the ip address
Use curl ipinfo.io/[ip address] (from xmodulo.com/geographic-location-ip-address-command-line.html)
How to scan nearby wireless networks from the command line:
xmodulo.com/manage-wifi-connection-command-line.html
How to send email from a script:
http://linuxconfig.net/manual-howto/sending-mail-from-bash-script.html
It will work on Windows systems if you install Linux as a dual-boot option. It will default boot to Linux. Password protect Windows so that the "user" is forced to only use the Linux OS. You can have Linux boot without requiring a password login. This will keep the new "user" busy while your computer is phoning home. Just don't write the super-user password down on your computer.
If you have the public IP address, you can get a close physical location, but probably not close enough to matter. However, if you also have a list of the nearby wifi networks and signal strengths, you can pinpoint the location pretty accurately if you know some trigonometry. See? This is one good reason to pay attention in math class.
It may take some roaming around from the IP address's stated location before you find one of the networks, but in theory it should be possible to locate the missing PC.
Here are the steps.
1. Backup your PC. You know, just in case you accidentally have it install Linux by erasing your Windows installation.
2. Install a linux operating system if you don't have one already. Choose dual-boot if you wish to keep Windows.
Prevent the new "user" from easily re-installing the operating system:
3. In BIOS, set the boot order to boot to the hard drive only.
4. Password protect BIOS so step #1 can't be changed without the password.
5. If you'd like to be able to remotely log-in to the PC if you knew its IP address, install openssh-server.
sudo apt-get install openssh-server
6. Enable your PC to email you by setting up mail:
sudo apt-get install ssmtp
sudo apt-get install mailutils
If you have gmail, you have to change your google account setting to allow access from less secure apps, otherwise it will block your PC's login attempt. If you forget to do this, you'll get an email that will tell you that google blocked a login attempt.
7. Edit the mail configuration file
sudo gedit /etc/ssmtp/ssmtp.conf
# Example file /etc/ssmtp/ssmtp.conf ---------------------------------------------------
# Config file for sSMTP sendmail
#
# The person who gets all mail for userids < 1000
# Make this empty to disable rewriting.
root=your.email.address@gmail.com
# The place where the mail goes. The actual machine name is required no
# MX records are consulted. Commonly mailhosts are named mail.domain.com
mailhub=smtp.gmail.com:587
AuthUser=your.email.address@gmail.com
AuthPass=your.gmail.password
UseTLS=YES
UseSTARTTLS=YES
# Where will the mail seem to come from?
#rewriteDomain=
# The full hostname
hostname=gmail.com
# Are users allowed to set their own From: address?
# YES - Allow the user to specify their own From: address
# NO - Use the system generated From: address
FromLineOverride=YES
# end of file --------------------------------------------------------------------------------------------
8. Change permissions on the email config file so that a non-superuser can't view its contents. We want to hide the ssmtp.conf file from non-superusers because it contains the password for your email.
sudo chmod 600 /etc/ssmtp/ssmtp.conf
9. Install curl so we can get the public IP address the computer is using.
sudo apt-get install curl
10. Create a script. We'll show you an example in a bit. In order to run every day that the PC is powered on, copy your script to the directory: /etc/cron.daily/
Make sure the name of your script does not have an extension, or else it won't run. If you name it checkin.sh, thinking it'll work because some shell scripts end in .sh and it even runs from the command line, it still won't run automatically.
Here's an example script that will email you the public IP address and the surrounding wifi network names and signal strengths.
#!/bin/bash
#
# Get public IP address and save it in ~/.locality at the end of the file.
# Save only the IP address to the file, and error output to the bit bucket.
curl ident.me > ~/.locality 2>>/dev/null
# Get the location of the ip address that's saved in the file .locality and dump the error in the bit bucket.
curl ipinfo.io/<~/.locality >> ~/.locality 2>>/dev/null
# Check if I'm superuser. It should be, if it runs automatically.
if [[ $(id -u) -eq 0 ]]; then
echo "" >> ~/.locality
echo "Superuser" >> ~/.locality
echo "" >> ~/.locality
else
echo "" >> ~/.locality
echo "Regular user" >> ~/.locality
echo "" >> ~/.locality
fi
# Scan for wireless networks and save to the same file. Send errors to the bit bucket.
# must be superuser to run this command.
iw dev wlan0 scan >> ~/.locality 2>>/dev/null
# Subject
SUBJECT="My PC location"
# To
TO_EMAIL="your.email.address@gmail.com"
# Message
# Sending email using /bin/mail
mail -s "$SUBJECT" "$TO_EMAIL" < ~/.locality
# Delete the .locality file.
rm ~/.locality
# end of script checkin ---------------------------------------------------------
11. Hide the contents of your script from regular users, but allow them to run it, because, you know, another email confirmation is great.
sudo chmod 711 /etc/cron.daily/checkin
Additional Information
How to find the public IP address from the command line:xmodulo.com/how-to-find-the-public-ip-address-from-command-line.html
How to find the geographic location of the ip address
Use curl ipinfo.io/[ip address] (from xmodulo.com/geographic-location-ip-address-command-line.html)
How to scan nearby wireless networks from the command line:
xmodulo.com/manage-wifi-connection-command-line.html
How to send email from a script:
http://linuxconfig.net/manual-howto/sending-mail-from-bash-script.html
I'll bet some experts out there can improve on this. If you have any great ideas, leave a comment!
Saturday, March 7, 2015
How to install the Nvidia 346.35 driver for a GTX 960 video card on Linux Mint 17.1
It took several tries and research on the internet to figure out how to get the driver loaded. After crashing Cinnamon a couple times, I figured out how to get it to install without crashing and everything seemed to work right. Since I had such a difficult time figuring out the correct way to install the driver, I'm creating this guide in case it can benefit someone else.
Click here for a more recent tutorial on installing version 352.63 on Linux Mint 17.3.
System build specs
Motherboard: Biostar A960G+
Video card: EVGA GeForce GTX 960 video card
Ram: Corsair 8GB DDR3 CML8GX3M2A1600C9
Installation procedure
I followed these steps exactly and it worked without crashing anything.
1. Print out these instructions. Read through them before doing anything so you understand the procedure. It's helpful to understand what you're doing, instead of just typing a command because someone said to do it.
2. Backup your system, unless you're starting from a fresh install, like I did. I installed Linux Mint 17.1 from a DVD that I burned.
3. Then I installed the updates, so the system was up to date. I updated it before attempting to install the video driver.
4. Download the Nvidia 346.35 driver for Linux.
5. (Optional) Make a backup copy of grub.cfg in case you need to revert back. Open a terminal, and type the following:
cd /boot/grub
sudo cp -p grub.cfg grub.cfg.original
6. (Optional) Backup grub
cd /etc/default
sudo cp -p grub grub.original
7. Since the driver installation requires that we boot into a terminal instead of the GUI, we need to change that, temporarily. We need to make two changes to the file /etc/default/grub, with gedit, running it as super user:
sudo gedit grub
Add the word text so that the following line looks like this:
GRUB_CMDLINE_LINUX_DEFAULT="quiet splash text"
The next item is important, otherwise, you'll get a black screen instead of booting to terminal.
Uncomment the following line (remove the #)
GRUB_TERMINAL=console
If you don't uncomment that line, you'll get a black screen instead of a terminal. Not fun.
sudo sh NVIDIA-Linux-x86_64-346.35.run
Say yes to everything. It said a pre-install script failed, but I continued installation anyway.
14. After installation completes, don't reboot yet. We still have to fix grub so it doesn't boot to a terminal again. We'll use the pico editor since we're not in the GUI.
cd /etc/default
sudo pico grub
Remove the word text so the line is back to how it was before:
GRUB_CMDLINE_LINUX_DEFAULT="quiet splash"
Click here for a more recent tutorial on installing version 352.63 on Linux Mint 17.3.
System build specs
Motherboard: Biostar A960G+
Video card: EVGA GeForce GTX 960 video card
Ram: Corsair 8GB DDR3 CML8GX3M2A1600C9
Processor: AMD FX-6300
Installation procedure
I followed these steps exactly and it worked without crashing anything.
1. Print out these instructions. Read through them before doing anything so you understand the procedure. It's helpful to understand what you're doing, instead of just typing a command because someone said to do it.
2. Backup your system, unless you're starting from a fresh install, like I did. I installed Linux Mint 17.1 from a DVD that I burned.
3. Then I installed the updates, so the system was up to date. I updated it before attempting to install the video driver.
4. Download the Nvidia 346.35 driver for Linux.
5. (Optional) Make a backup copy of grub.cfg in case you need to revert back. Open a terminal, and type the following:
cd /boot/grub
sudo cp -p grub.cfg grub.cfg.original
6. (Optional) Backup grub
cd /etc/default
sudo cp -p grub grub.original
7. Since the driver installation requires that we boot into a terminal instead of the GUI, we need to change that, temporarily. We need to make two changes to the file /etc/default/grub, with gedit, running it as super user:
sudo gedit grub
Add the word text so that the following line looks like this:
GRUB_CMDLINE_LINUX_DEFAULT="quiet splash text"
The next item is important, otherwise, you'll get a black screen instead of booting to terminal.
Uncomment the following line (remove the #)
GRUB_TERMINAL=console
If you don't uncomment that line, you'll get a black screen instead of a terminal. Not fun.
8. Save and exit gedit.
9. Re-build grub.cfg by running the command
sudo update-grub
10. We're still in the GUI now, but after we reboot, it should go straight to a terminal instead of launching the GUI. Reboot now by going through the normal turn-off procedure
11. When the computer turns back on, it should be in the terminal window, asking for login. Type your user name, hit enter, then enter your password. If you got a black screen, you probably didn't uncomment the correct line in step 7.
12. You should be at the command prompt now. I assume you downloaded the Nvidia driver to your downloads directory. We'll go there now.
cd Downloads
13. Run the installation driver by typing:sudo sh NVIDIA-Linux-x86_64-346.35.run
Say yes to everything. It said a pre-install script failed, but I continued installation anyway.
14. After installation completes, don't reboot yet. We still have to fix grub so it doesn't boot to a terminal again. We'll use the pico editor since we're not in the GUI.
cd /etc/default
sudo pico grub
Remove the word text so the line is back to how it was before:
GRUB_CMDLINE_LINUX_DEFAULT="quiet splash"
You should probably leave this line uncommented:
GRUB_TERMINAL=console
15. Save the file and exit pico. So in the future, if you hit ctrl-alt-F1, you should get a terminal. If you comment the above line again, it just goes to a black screen. To get back to the GUI, hit ctrl-alt-F7 or ctrl-alt-F8, but don't do that now since we're not in the GUI yet.
16. Now we need to rebuild grub.cfg with the following command:
sudo update-grub
17. Shutdown the computer with the following command line:
sudo shutdown -h now
18. Turn the computer on, and it should boot up normally, into the GUI with the Nvidia driver. But it doesn't list it in System Settings / Device Drivers.
Leave a comment if this helped you.
Thanks.
Subscribe to:
Posts (Atom)