Thursday, May 5, 2016

How to Replace the Turbo on a 2008 Ford F250 6.4 Diesel

I don't often take selfies, but here's one for the record. That truck behind me was up for sale and for some reason I went back and got it after I thought it through and decided not to buy it. As I was working on it, I asked myself "what was I thinking?". As I was driving it, looking at the MPG, I again wondered, "what was I thinking?"
Me and my truck

When I replaced my turbo, I sure could have used a step by step guide on how to remove the turbo. It would have saved me a lot of time. So, to satisfy your curiosity, here's what I would do if I had to do this again. I hope I don't leave out any important steps.

At first glance, opening the hood, I didn't know what was what. I've never had a diesel before.

What's what under the hood
How to get at those awkward bolts
For many of the exhaust bolts, we'll need a flex head ratchet handle like the Craftsman 44815 because you can put a wrench on the handle and turn bolts facing the opposite direction, like this photo.

Here's how I'd do it if I had to again.
1. Disconnect both batteries and remove the driver's side battery.

2. Drain about 2 gallons of coolant from the radiator.

3. Remove the coolant reservoir / battery box assembly. It's held on with four bolts and some hoses. There's a vacuum reservoir on the bottom of the battery box with a vacuum line attached to the small port. You need to pull the wire retainer clip from the coolant hose end to remove it from the reservoir. Be careful not to bend the clip so you can reuse it.
Battery box / vacuum reservoir / coolant reservoir

4. Remove the fuel cooler / crossover tube assembly and mounting bracket as a unit:

Disconnect the fuel lines, drain the coolant, and disconnect the coolant lines.

I could have used this guide when I started. It would have been easier to get the coolant reservoir out of the way before this step. Remove the nuts from the three studs at the bottom center of the above picture. The oil dipstick is bolted to the stud on the left (towards the front of the truck). Remove that bolt, pull it off and there's another nut underneath you need to remove also. Then remove the two nuts on either side that hold it to the top of the valve cover. Slide the assembly toward the driver's side. Be careful not to damage the air seals. The air tube from the low side turbo can be pulled out.

The top right stud holding the fuel cooler assembly also holds an exhaust pressure sensor?

The top left stud for the fuel cooler mount appears in this photo next to the hose clamp for the intercooler.

Bottom bolts holding on fuel cooler assembly and oil dipstick

There's the intake side of the high side turbo. It wouldn't turn by hand. Wait 'till you see the other side.

5. Spray penetrating oil on all the exhaust bolts on the back of the turbo assembly. Remove the small exhaust tube with the sensor on the top and set it aside.

6. Remove the air filter assembly. Loosen the clamp to the low side turbo input. Remove the clamp on the hose going to the oil fill thing. Disconnect the plugs to the air filter monitor and MAF sensor. If the assembly doesn't lift out, there are two bolts supporting the mount: one by the battery, and one by the air intake. This picture is after I removed the turbo.


7. Remove the two banjo bolts that attach the oil supply lines to the turbos. Then remove the four bolts holding the heat shield on. These were rusted and I broke the one that I couldn't access with my electric impact screwdriver. Remove the heat shield. It'll bend a little.


8. Disconnect the exhaust pipe between the EGR cooler and the back of the turbos (7 bolts). This won't have enough room to come out, but you can move it around to access the other bolts you need to get to. You need this pipe out of the way to get at the six bolts holding the exhaust inlet pipes on the back of the turbo assembly. There's a mounting bolt in the middle of the pipe. Get this one from under the truck. Try a 6 point 10mm shallow socket on a 6" wobbly extension attached to a U joint, attached to a long extension to your ratchet handle. For all the 10mm bolts on the exhaust, use a six point socket. Do not use a 12 point socket on any of the exhaust bolts. That may strip them.

9. Remove the six bolts holding the two exhaust pipes on the back side of the turbo assembly. You'll need to get creative with your flex head ratchet. You need to be able to put a wrench on the end of the ratchet handle, so the Craftsman 44815 works pretty well here. Then remove the exhaust pipe from the back of the low side turbo. Don't bend the clip on top. It holds the pipe in place while you clamp it. Lift the pipe up and back. You probably want help here.

10. Remove the two main bolts holding the turbo assembly to the engine. In this picture, I'm on the front bolt. The other one is directly behind it. Don't remove the 10mm nut holding the high side turbo's oil return line down.

Removing the front mounting bolt for the turbo assembly

The two bolts and brackets that hold the turbo to the top of the engine

11. With all the exhaust bolts out and the two main mounting bolts out, you'd think you can just remove the turbo. Well, maybe, and maybe not. There are two pins on the bottom of the turbo that may be a little tight or rusted. First of all, the turbo assembly weighs about 80 pounds. So I used a shop crane to try to lift while I used a pry bar. I probably had too much tension with the shop crane which made the pins bind.
The pins are under the high side turbo. If you lift front and back at the same, straight up, you may be able to get it off easier than I did. Keep in mind, it weights 80 pounds. Here's a shot of the bottom side, looking from the back side after I removed it.

Bottom side of the turbo assembly, with the low side turbo on the right

Here's where the turbo was. You can see the two oil return passages for the low and high side turbos. Be sure to replace that o-ring on the high side turbo's oil return. The heat from the turbo cooks it and then it starts leaking. 

Here's what the turbo mounts to. There are two threaded holes for the bolts, and two holes for the pins.

Have fun getting those exhaust bolts off. Good luck.

Engine compartment after removing all that stuff

I took the turbo out by moving it towards the driver's side, with a shop crane lifting it.

The turbo assembly, suspended from a shop crane. A shop crane with a longer reach would have been nice.

12. I had to use my press to separate the variable vane control from the turbo. It was in there pretty tightly.

Here's my press setup. The punch started to bend, so I replaced that with a 5 mm deep socket and tried again.

Here's my first setup for pressing out the control linkage for the variable vanes.


To put it back on the new turbo cartridge, I oiled it and pressed it in with two pairs of pliers. Then I re-attached the E-clip.

So, what did I find?
That's some nasty buildup. Wait, why is the turbofan broken off?

There's a turbo fan that broke off the shaft, and a lot of soot buildup. Here's where the turbo fan was supposed to be.

Exhaust side of the old turbo, missing the fan.

The fan blades got pretty chewed up.
After cleaning up the variable vane stuff
New turbo cartridge, exhaust side

New turbo cartridge, intake side

I made the mistake of being too easy on the throttle after I got it all back together. So it turned on the check engine light for P132B (boost levels not achieved during learn cycle) and P2263 (turbocharger boost system performance). I was trying to get good gas mileage. My truck was telling me not to take it so easy. It'll get up and accelerate faster than any other car I've owned, but it gets 13 MPG.

Update Sept. 2017

I didn't replace the o-ring on the high side turbo oil return when I did this job. It was leaking about a quart every 300 miles by the time I finally took the turbo off again and replaced both the oil return o-rings on the high side and the weird seal on the low side. I was wondering if the two turbos were designed by two completely different engineers because they're so different.

Monday, April 18, 2016

How to Buy a Used Car: Vehicle Inspection Checklist / Worksheet

How to buy a good used car, or a project car, and how to tell the difference

Most of us don't have a spare million sitting in the bank available any time we want to buy a brand-new vehicle. The rest of us get to choose from the old, used cars that someone else got tired of.

We want to avoid buying a car that we later find out has a bunch of problems we didn't know about. A good inspection should be able to uncover most of these problems. You could take it to a mechanic, but expect to pay for the inspection. This can get expensive if your mechanic finds problems that makes you decide against several cars you paid him to inspect.

My Vehicle Inspection Checklist (click here to download pdf)

Or if you're looking to save money by buying a project car, then this worksheet can help you evaluate what it would take to fix it.

You can do the inspection yourself, but it helps if you have a close friend or family member help you. You just have to know what to look for. I often forget to check things because I get distracted or excited about a car, so it's a good idea to bring along a checklist, flashlight, pen, paper towels, and an OBD-II scanner that you can connect to your cell phone. 

Usually, used cars from a dealer already have had an inspection done. It's the cars from private sellers that really need a good look-over. I looked at buying a truck a while ago and saw a great price, $3300. I went that night and took a look with my flashlight. I found several problems that the owner said he didn't know were wrong. I saw a broken leaf spring and noticed that the front differential had a leaking seal, just by getting down and looking. The engine had a persistent misfire. He said it was like that since he got the truck a few years ago. The transmission's synchronizers were worn out. You couldn't downshift without the gears grinding really bad, unless you did a double-clutch throttle bump. The check engine light was non-functional or disabled (that's why it wasn't flashing during the misfire). And the OBD-II port's wires were cut, so I couldn't get any information with a code scanner. I offered the guy a stupidly high $2000 for a project truck that I didn't really want. He never took me up on the offer though. But if I had a good inspection form, I could have figured out a better estimate of the truck's value, which may have been only scrap value.

One mistake I made was on a 1994 Dodge Caravan 3.8L AWD. The van was vandalized and looked like it just needed tires and a couple windows. But it sat for a long time. So I bought it for $100 and put tires and glass on it. Then I did brakes, fuel pump, a driveline bearing and seal, etc. Getting the thing back to good running condition cost me $1900, and that was me doing all the labor except for the tires and glass. We drove that van for no more than 25,000 miles before the transmission quit at just over 100,000 miles. 

Brakes and tires are consumables. Cars go through them and if they're in need of replacement it's usually not that big a deal. The big deals are the engine and transmission. If you have a $2000 car and the engine quits, then you just sell the car as scrap and buy another $2000 car. But you want to get a decent $2000 car, not a basket case.

Do Your Homework

Research the car you're interested in first. Check out reliability reviews. Determine the value. Use my checklist to evaluate your own car before you go check out that new ride. That way you'll be better able to quickly determine the value of the car and what price is fair.

Negotiating the Deal

There's much more to the price of a car than the value. When you buy from a private party instead of a dealer, you're likely dealing with someone who has some emotional baggage tied up in the car. Maybe they liked it. Maybe they hated it and it cost them money. Maybe they are unwilling to face the reality of the value. 

Cars that are priced at their actual value really do sell quickly. You will probably run into someone asking more than it's worth and firm on the price. One example is this 1962 Thunderbird with no engine and no transmission. I've been seeing this car on the classifieds for maybe a decade now. 
Still up for sale. Has it been a decade? Still not worth $4500.
So you'll want to know up front if they're willing to negotiate on price. If they're asking more than it's worth, one of the first questions you want to ask is if they're willing to negotiate on price. You may want to follow that up with asking them how they determined the asking price. 

Most private sellers don't understand that selling faster for less is often more profitable than waiting for the higher price. Consider a small dealership that sells ten used cars a week for an average $500 profit each, making $5000 a week. Maybe they could make $1000 profit on each car, but are only able to sell two a week at the higher prices. That dealership probably wouldn't want to have a space occupied by a car that isn't bringing in any revenue. They would be willing to lose money on a car to get the space to be available for more cars. If they had only 20 spaces, and had an inventory of 10 cars that weren't selling, they would lower the price on those, even if it meant a short term loss. 

So before you travel to look at the car, ask if they're willing to negotiate. My brother asked me to help him take a look at a Toyota Prius. I brought along the checklist and found some things wrong with the car that weren't readily apparent. The front end and back end had minor unrepaired damage. He was asking $8000 for a $6000 car and was unwilling to negotiate. When I said that I found some things wrong with the car, he immediately got defensive and said he didn't want to get beat up on price. He brought up unrelated situations such as the boat he had in his back yard as the reason he couldn't come down in price. It was a learning experience. 
I'm not saying that over-priced cars don't sell. They sometimes do. But you don't want to be the one over-paying. The guy with the Prius actually called my brother back and bragged that he sold it for $8000.

Don't get emotionally involved. You don't have to have that car. There are more cars added to the classifieds every day. Always be willing to walk away. 

My inspection checklist has gone through several revisions as I improve it. There is an order to the efficiency. You want to start with the most important things first, and not spend too much time on a car that you will decide against.
  1. Take it for a test drive 
  2. Inspect the interior 
  3. Look under the hood 
  4. Look over the exterior
  5. Look underneath the car
I tend to forget to check things, so I've created a checklist so I don't miss anything critical. My wife says it's for the totally OCD buyer. I can't disagree because sometimes you have to be thorough to avoid buyer's remorse. You don't want the checklist to be so long or unorganized that you toss it on the seat and don't refer to it. I brought Ford's 172 point inspection checklist with me to inspect a truck, but ended up not using it because it was vague, wasn't organized in a useful order, and had a lot of things that didn't apply.

Here are some pointers to help you know what to look for while you're going through the vehicle inspection. Write down everything that you find wrong with the car that needs to be fixed.

Engine and Under the Hood

If the engine oil is black, then it's probably overdue. Check for head gasket failure by removing the oil cap and looking for any gray slime. Any gray slime means coolant is getting into the oil. Coolant corrodes engine bearings, so if you see any gray slime, consider the engine in need of replacement. Check the radiator for any gray slime, meaning oil getting into the coolant. (Don't open the radiator if the engine is hot or the radiator hose is pressurized.) 

Are there signs of oil leaks, like large black spots on the driveway? Most oil leaks aren't too hard to fix. Rear main oil leaks are more difficult because you have to take out either the engine or transmission to get to them. There's a weep hole between the engine and transmission. If it looks like oil is coming from there, the engine's rear main seal or the torque converter seal may be leaking. 

Check the air filter. A very dirty filter means the owner hasn't had time (or money) to properly maintain the car. If the air box has been replaced with a so-called "cold air intake", ask for the original parts. The factory air box may actually perform better.

Brake fluid should not look muddy, ever.

If the automatic transmission fluid is pink and opaque, coolant may be getting into the transmission because of a crack in the transmission cooler in the radiator. The fluid should be reddish. If it's brown, it's overdue for a change. If it is black or smells burnt, then the clutch packs are slipping and it needs a new (or remanufactured) transmission.
 
[Update April 2021] There may be times when you can't tell when a transmission or engine has problems. I have a 2007 Ford Freestyle that has a transmission that won't go when below 40F. The fluid pressure is too low until it gets warmed up. 

My son bought a car that lasted about six weeks until the engine bearings failed. For his next car, the transmission failed the day after he bought it. You can't always tell when something major is about to fail.

Branded Titles and Why to Avoid Them

The major reason to check over the exterior is to look for evidence of unrepaired damage. When a car is in an accident, or flood, fire, or weather damaged, and the insurance adjuster determines that it is more expensive to repair than replace the car, then the car is sold for scrap. These cars get branded titles, also called a salvage title. But some shops may repair such vehicles for much less than the insurance adjuster's estimate. To do this, they might take shortcuts. You pretty much have to take shortcuts to come out with a profit after the branded title discount. A branded title due to a minor accident or theft recovery could be a good deal still. I'd avoid a salvage title due to an accident that caused the airbags to deploy.

Here's a hypothetical situation. Say a car worth $10,000 was in an accident. It caused $8,000 worth of damage, so the insurance adjuster totaled it. Let's say a shop buys the car for $300. With a branded title, they can't get much more than $7000 for it after it's repaired. So they have an upper limit of about $6000 to spend on repair parts and labor. They put it up for sale for $8000, expecting to get an offer for $7000. But there's no way they can perform the full and proper $8000 repair and still make a profit. They had to cut at least 25% of the repair cost out of the actual repairs. The repair parts probably won't be certified to fit, and some damage may not be repaired or not repaired correctly.

But if you know the history of why the vehicle was totaled, you may be able to find a good deal, such as a theft recovery vehicle that wasn't wrecked.

Interior

A strong air freshener smell may mean that there is an odor that they're trying to cover up. I've seen this with a smoker owned car.

Value

You'll want to compare the vehicle condition to the blue book value. The only way to ensure you have an accurate estimate of the condition is with an inspection. After you come up with an evaluation, that's pretty close to your upper limit for an offer. Don't let a high asking price trick you into thinking the car is better than it actually is. Often, owners don't even know what's wrong with their car. If you can show them exactly what is wrong and what the value should be, you have a higher chance of them accepting your reasonable offer.

Remember that blue book ratings don't include cars in the poor condition category. These special project cars may require careful evaluation due to the high risk of becoming a money pit. If it doesn't start, it's in poor condition, no matter what the owner claims is wrong. They may say it just needs a fuel pump, but there may be other problems you can't find without it running.

My Inspection

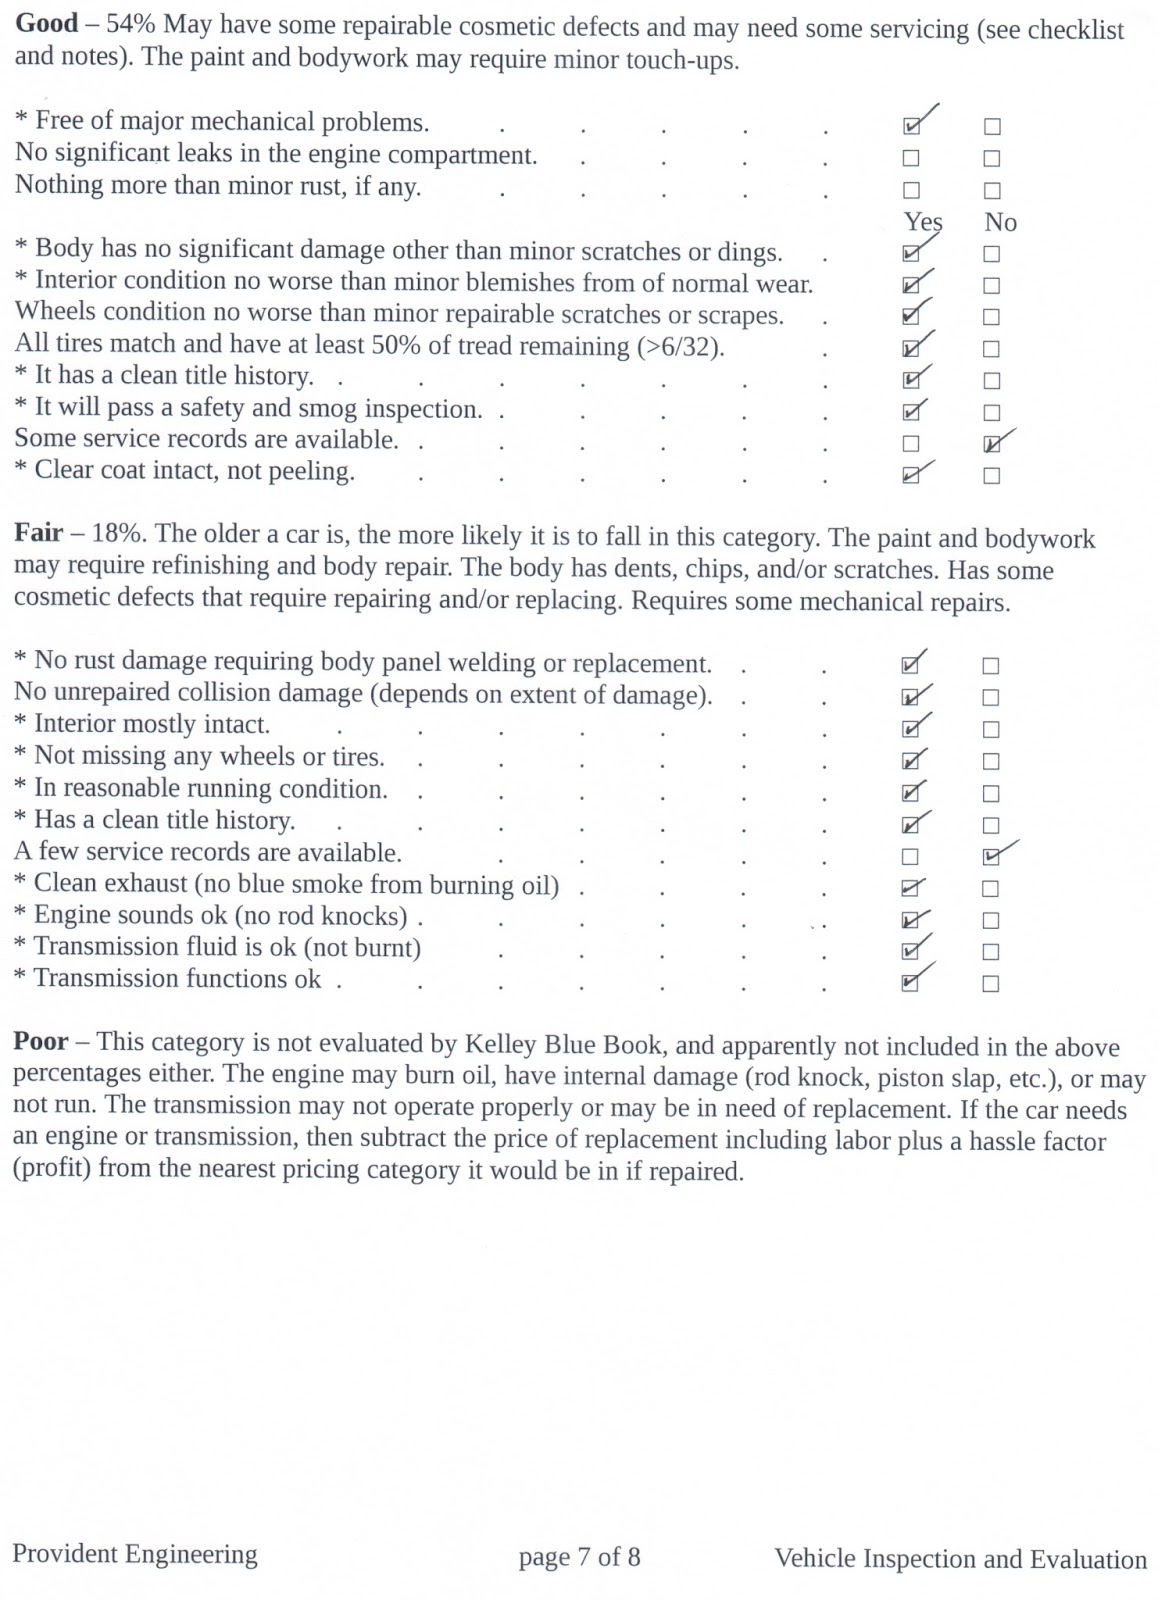
It took me about an hour to research the car, and about two hours to inspect it. (I was really thorough.) I found 15 things I didn't already know about, even though we've owned the car for a couple months.

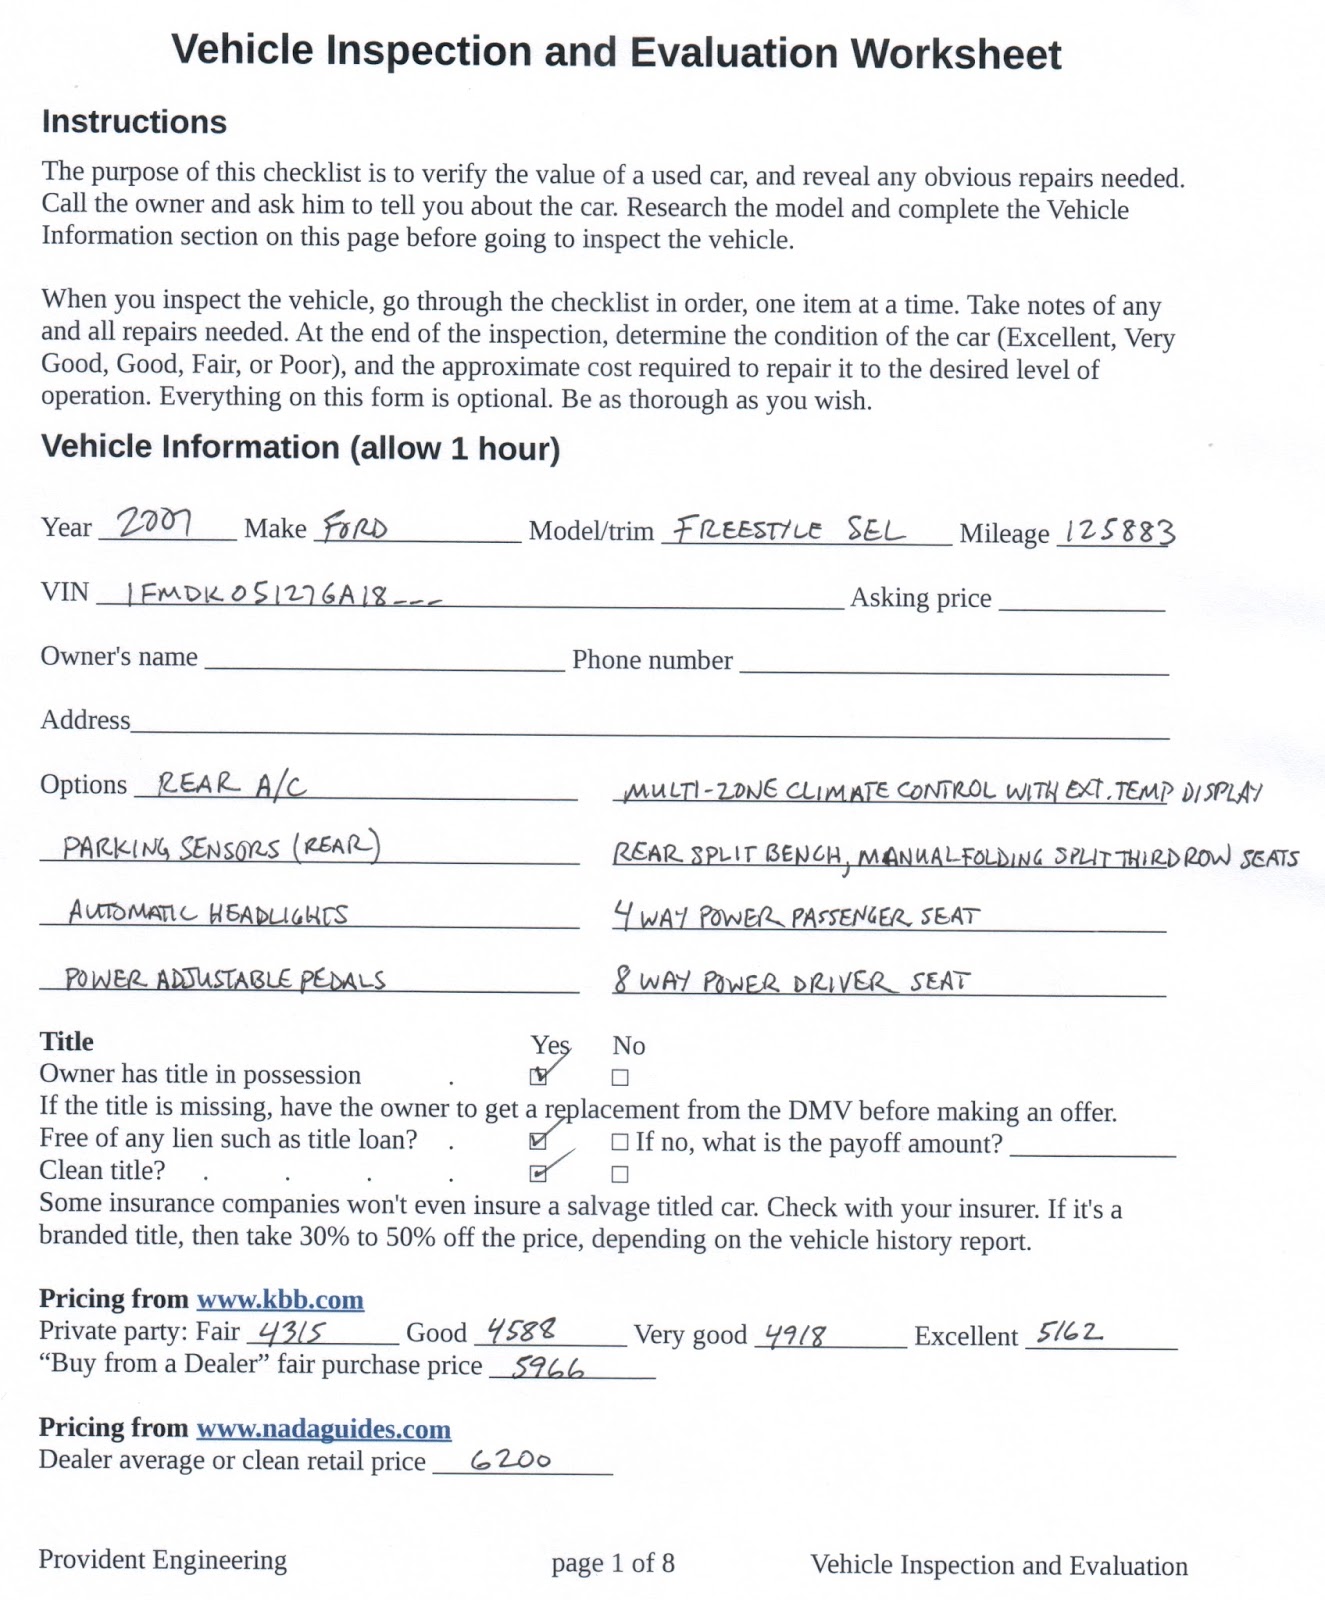
You may want to practice on your own car before going to look at a used car. I updated the inspection worksheet several times since I printed this one. Here are the results of my inspection.


Wednesday, April 13, 2016

Diagnosing No Power on a 2008 F250 6.4 Turbo Diesel

I've been wanting to get a pickup truck for more than 20 years. It had to have 4 wheel drive and a back seat. I found a diesel truck for sale and the ad said it needed an engine because it had no power and had excessive blow-by. I went to take a look at it even though I totally didn't want to take on that scale of a project.

I turned the key and it started right up and idled just fine. There was a strange air sound coming from the exhaust. It sounded like rushing air. So I took it for a test drive. It would go very slowly. When I pressed on the accelerator, it would just blow black smoke out the exhaust, and the turbo boost gauge wouldn't move from zero. I took the oil cap off and felt the air coming out at idle. I could hold the oil cap over the opening and there was enough air coming out to float the cap so it wouldn't rest on the opening.

I decided against buying it. Before I left, I told him I'd go evaluate the numbers and decide later. My mind was saying "no way, you don't want this project", but my heart was saying "I like the truck".

Then I decided to do an internet search for blow-by on that engine. Someone said their engine would run fine with it blowing like a choo-choo train. This didn't seem like THAT much, so I decided I'd try fixing the truck. I figured that if the engine sounded fine and it wasn't burning engine oil at idle, it may just need a turbo.

It was a risky investment, but somehow I ended up buying it and bringing it home. It went 15 mph up hills, and 60 mph down hills.


My first thought was that one of the turbos was bad. So I pulled off the air intake to see the low side turbo. It was spinning at idle. I pulled off the air tube from the high side turbo and snaked my bore-scope camera in there, but couldn't see anything. The high side turbo diagnosis will have to wait. There's a lot more you have to remove to get at the high side turbo.

Next, I verified that the mass air flow meter was functioning with my OBD-II scantool. But I happened to notice that the MAP sensor wasn't varying much. It was hovering around 24-25 in Hg whether the engine was idling, revving, punching the throttle, or even with the key on and engine off. I took the MAP sensor out and used a vacuum pump to verify operation. It was ok, so I cleaned out the carbon buildup and re-installed it.

There were no trouble codes because somebody erased them. You can tell because it records the miles since last reset. An OBD-II trouble code is an excellent diagnostic tool. But don't go and replace the sensor just because the trouble code is coming from that sensor. Sometimes a sensor is bad. Other times, the sensor reads out of range because of another problem. Sometimes multiple sensors give out-of-range readings, throwing many codes because of one simple problem.

The truck's DPF filter was removed and replaced with a DPF delete kit. I think they did this in an attempt to fix the no power problem. The kit came with a programmer that had five levels of performance. Level 5 claimed a 200 horsepower increase. So I plugged in the programmer and it said that the computer was programmed to level 5. Um, ok that's not going to fix it. So I returned it to the stock program. The amount of smoke coming out of the exhaust greatly decreased, but it didn't get much more power. But it would rev higher. I didn't take it out for another test drive because that wouldn't give me any more relevant information for troubleshooting.

I unbolted the turbo's variable vane actuator and moved the unit while the engine was idling. I had the air tube on the turbo's output disconnected. Moving the vane control didn't seem to affect the airflow coming out of the high side.

Finally, I opened up the high side turbo and found that the turbo would not turn by hand. It would rotate with a wrench though. There's my problem. The high side turbo needs to be rebuilt. Just FYI, that nut you see in the center of the turbo is reverse-threaded. Turn clockwise to loosen.


We'll see if a new turbo makes it go.

Sunday, March 20, 2016

Fixing a Persistent Oil Leak

After replacing the valve cover gaskets, the oil pan gasket, and the entire timing cover set on my 1999 Cougar 2.5 V6, I still had a pretty bad oil leak. It was coming from somewhere on the front of the engine and I couldn't see it dripping with the engine idling, but it would leave spots on the driveway and there was oil all over the wheel and down the side of the car.

I finally had time on Saturday to tackle the oil leak. So I jacked it up and set it on jack stands and let the car idle as I poked around with my flashlight, looking for drips.

We used a hot water pressure washer to clean off the oil the night before. I then drove it and when I came back, there was lots of fresh oil on where we cleaned.

So I was kind of perplexed when I couldn't see any drips with the engine running, yet there was plenty of fresh oil on the car. So I decided I needed to look while the engine was running at 3000 RPM. The first place I watched was the front crankshaft seal. As soon as the engine revved up, oil started oozing out of the seal.

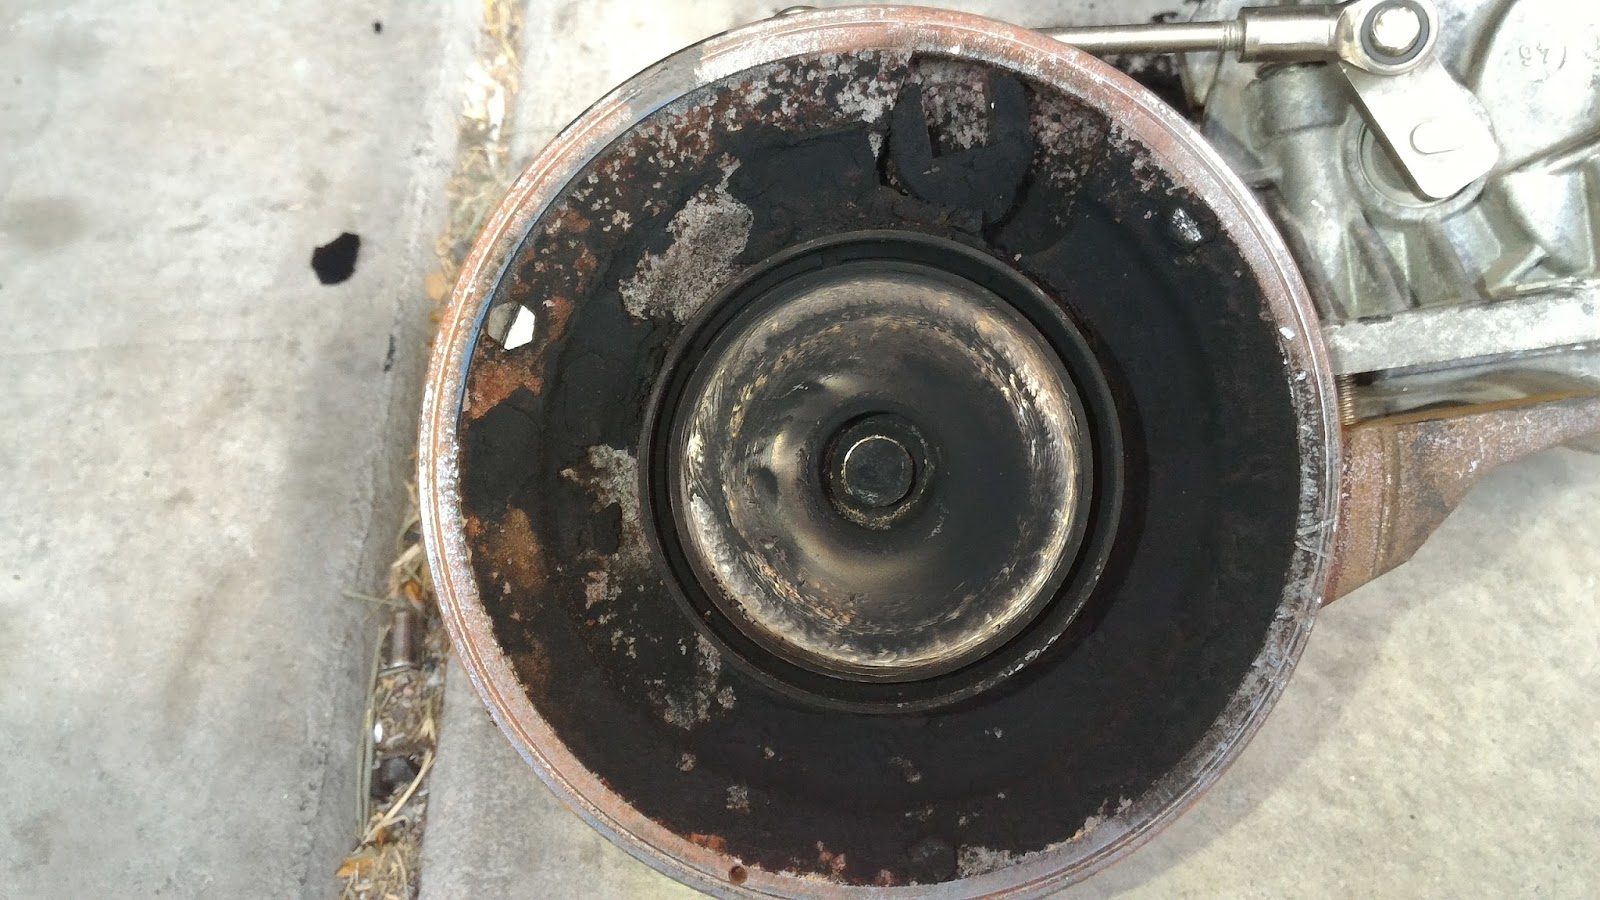
I thought it wasn't that seal, because I had replaced it a while back (and it didn't stop the oil leak, obviously). So this time, I resurfaced the crankshaft pulley where the oil seal rides.


I used a scotch-brite type pad on a die grinder to resurface it. There was a small dent I was worried about that you can see in the above photo. But after getting it all back together, we revved it to 3000 RPM and there was no leak from this seal. What a relief! Now I can get my driveway clean again.

The oil leak was only persistent because I thought my previous repair was successful, and hadn't verified it wouldn't leak at high RPM.

Thursday, March 10, 2016

How to Sell a Car

How hard can it be? Some people put very little effort into preparing their car for sale, and even less effort in creating an ad. But with proper preparation, you can avoid showing your car to people who realize it's not what they're looking for, and instead, attract really interested buyers.

I'm doing this in hopes that I see better ads while I shop for a car. Yes, I'm looking for a pickup and I created this post because I got tired of really bad classified ads. The days of being able to sell a car by putting a "for sale" sign in the window are gone. It's all online ads now. At a bare minimum, you need a picture and a price in your ad. When you see an ad without one or the other, you shake your head and scroll past it. There are other very important details that could make your car selling experience either great, or laborious. It's up to you. Let me help you out.

Vehicle Preparation

There's a reason this section is first. You can't even set a price without a good inspection. First, clean up the inside and outside. It's nicer to inspect a clean vehicle. Hopefully you've been keeping it clean and it won't take much work.

Do a multi-point inspection. Here's an example form
After going through the checklist, even you may be surprised at what you find wrong with it. That AC that worked perfectly last season may not work this spring. Be up front with what's wrong with the car and what it needs. If you've just given up and don't want to clean it up or do any more repairs, then don't expect to get book price for it. Look at the trade-in value. You'll need to reduce the asking price. Car dealerships sell cars that are already detailed and in good running condition. Don't expect to even approach their selling price if yours isn't just as good looking and in near perfect condition. 

This may be obvious, but remove all personal belongings that you don't want to include with the car. I once bought a car that came with a wedding ring in the glove box, but I took the ring back to the owner. 

Mechanically inclined people often buy old cars because they have the skills to repair them. They'll know what to look for and will be able to detect neglect. If you haven't had the transmission serviced properly, they'll be able to tell by looking at the fluid. Expect them to look at the engine oil, brake fluid, power steering fluid, engine coolant, air filter, belts and hoses, and how much debris has collected under the hood. 

I was looking at an old pickup truck and saw that a rear leaf spring was broken. That was news to the owner. Then I said the engine was misfiring. (One cylinder wasn't firing for the whole test drive.) He didn't know that either. He didn't know the transmission's synchronizers were completely worn out. Maybe he never upshifted from fourth to third gear. He didn't know the check engine light was not functional, or that the OBD-II port's wires were cut so I couldn't check for codes with my code scanner. 

After the car is clean and prepped, then you're ready to take pictures.

Pictures

If you don't include a picture in your ad, you're not alone. About 6.8% of the car ads on ksl.com don't include pictures. I'm not trying to make you feel better about not including a picture. You may think it's not a big deal, and that somebody will love your car as much as you do, without even seeing it. Good luck. If you don't include a picture, you're about as lunatic fringe as the 7% of people that think the moon landings were faked. And if you're one that believes the moon landings were faked, I'm not saying you're a lunatic, just that you approach the world with a healthy dose of skepticism.

I've seen some truly bewildering photos in the classifieds. Here are some tips that are sure to make your ad stand out from the rest. A good set of pictures really helps to generate interest in your car.
  1. Focus! Clean the smudge off the lens. This should be a habit every time you pull that cell phone out to take a picture. Actually look at each photo full-screen before uploading it. Don't assume the picture is good if the thumbnail looks good. Only include pictures that are in focus. If the one you want is out of focus, re-take the picture. A good camera helps to get good pictures. If you can tell that the picture was taken with a cell-phone that has fingerprints or scratches on the lens, find a real camera and re-take the picture.
  2. Take all pictures in landscape mode. Yes, every last one of them needs to be in landscape orientation. If you upload a picture in portrait orientation, it will shrink to fit in the landscape box. See what I mean?
  3. Make sure they are oriented vertically. We don't want to turn our head to the side to view the picture. Worse yet, we don't want to stand on our heads. Don't think you're being clever by posting an ad with an upside-down picture. An upside-down picture is a bad picture. It's hard to visualize. That'll just irritate us and we'll skip it.
  4. Fill the frame. You want as much of your car in the picture as possible. Pavement and sky don't sell. If you didn't zoom in when you took the picture, you can always crop the photo using a free photo editor such as irfanview.
     
  5. Avoid sunlight glare. Take pictures preferably on an overcast day because lighting is great then. 
  6. Take pictures of both the interior and exterior. Yes, we do want to see what the interior looks like. If you don't include interior pictures, we may wonder what you don't want to reveal. 
  7. If you take a picture of a tire to show tread depth, do it with a tread gauge in the picture. Then list the tread depth for each tire. Otherwise, we'll think yay, it has tires! I'm sure glad those were included! 

  8. Fish-eye effects don't look good. We're not here to admire your artistic efforts. We like to see realistic photos. Step back and zoom in. 
  9. Don't include duplicate or very similar pictures. 
  10. Get all the sides of the car. Get pictures of the inside dash, doors, seats, carpet, stereo, etc.
  11. The main photo (the ad's thumbnail picture) should be the outside of the car and recognizable for what model it is. If you're selling a Suburban, the main photo shouldn't be of the front because it looks too much like the pickup. Side views are better for pickups because you can see if it has a regular cab or extended cab or crew cab, long bed, short bed, or service bed, camper shell, etc. 
  12. Don't use stock photos from the internet in your ad. We know that's what a similar car looked like brand-new, but yours isn't brand-new anymore. We'll just assume that either your car looks so bad you couldn't bear to show what it really looks like, or you are too poor to buy a digital camera, or you can't figure out how to upload pictures. All of the above would lead us to believe you didn't maintain your car very well. Yes, a stock photo is as bad as not including a photo.  

Price

This is where you can really create interest and sell your car fast, or end up having your ad expire without an offer. Don't expect to get top dollar without putting the time and effort into preparing the vehicle and creating a great ad.

Don't say the price is $1 unless you're really serious. Even then, you'll have to clarify that the price really is a dollar because of all the other not-really-a-dollar ads. People assume you're waiting for some idiot to offer more than it's worth. Ridiculous prices are the same as no price. You can almost hear the mouse wheels scrolling past your ad.
If you're upside-down in your loan, that doesn't mean you'll get what you owe because someone feels sorry for you.

Do research on the price with all the correct options and mileage. Set the price accordingly. There are several free online tools for this such as kbb.com. Unless you're a car dealer, use the private party selling price. There's a reason car dealers get more money for a car than a private seller, and that has to do with vehicle preparation. Most private sellers don't go through the prep work necessary to make it look like a showroom car.

Don't start high and expect to negotiate down to your expected selling price. That just means you'll only get hard negotiators interested in the car. Set the fair price first. Don't get greedy or you'll wait a long time for a sucker to come along and buy it at the high price. The car's value may decrease in that amount of time. Time is money. How much time are you going to spend trying to sell it? How much was that worth per hour? You don't want to spend time showing your car to 50 people before somebody finally buys it (unless it's worth $100,000).

Blue book on this Ranger is $5300. I've been watching this ad for a month. This guy is asking too much and hasn't had any luck selling it for 30 days.

Specifications and Details

Here's where you sort out who really wants your car. Correctly fill out all the blanks because these go into the search engine. This will help bring you serious buyers and  you won't have to waste time with people not interested because it has one feature or lacks another. For example, on KSL.com classifieds, you can specify the following information about your car, as in this poor example:

Year: 2007

Make: GMC

Model: Yukon

Trim: not specified

Body: Crossover

Mileage: 200,000

VIN: 1GKFC13017J2*****

Title Type: Clean Title

Exterior Color: not specified

Interior Color: not specified

Transmission: not specified

Liters: not specified

Cylinders: 8

Fuel Type: Flex Fuel

Number of Doors: not specified

Exterior Condition: not specified

Interior Condition: not specified

Drive Type: RWD

You may not think that a certain feature is desired, but it may be what someone is looking for. Or someone may not want that feature and you won't have to spend time showing them the car if that's a show-stopper for them. Unfortunately, even car dealers are unreliable at entering the correct specs. I've seen dealers say that a car is a manual transmission and the interior picture shows it's an automatic. (It wasn't a 3-on-the-tree.)

Please use a dictionary if you're not sure. Spell check doesn't tell you that you used the wrong word. It's not a Cadillac converter. It's a catalytic converter.

Use the proper definitions of words and be honest about the condition of the car. Be clear.
Wait, what? How does it run without the motor? Oh, how I wish there was a comments section in classified ads. Some of us will understand that there is a misfire in one of the cylinders, but as stated, it has no motor. Write the ad not just so that it can be understood, but write it so that it can't be misunderstood.

If you've done any modifications, such as a cold air intake, you will not get your money out of it. In fact, the new owner will probably want the original air box so he can buy the OEM style air filter. List all modifications done. A modified vehicle has a much smaller market and may take longer to sell, even at a fair price.

Where to Post Your Ad

Find the most popular online classifieds for your area. For Utah, it's ksl.com. Ask your friends. Call a dealer and ask where they post their online ads.

Presentation

Be friendly and show the buyer the features of the car and any interesting quirks. Show them how to operate any uncommon features. We all know the turn signal, but the OBD-II port may be in a strange place, like on the passenger side as in my Thunderbird.

I like the owner to ride along during the test drive. That way I can talk to them about the car while I drive it.

Maintenance records are helpful. We want to know when the last time the transmission was serviced, how regularly it was serviced, and how often the oil was changed. We definitely want to know if and when the timing belt was changed.

Negotiation

Know your limit. Don't go way below book value if the car is worth more. The buyer will probably ask you if that's the best you can do. Yes, you could take less, but why? If you have already done your homework and set a great price, you won't need to come down very much, if at all. When I sold my 1994 Caravan AWD with a bad transmission for $300, the buyer tried to talk me down, but I had other people interested in it for the same price, so I wouldn't come down. They bought it for $300 anyway.

When my son was selling his 1996 Outback with a rod knock for $300, the buyers offered $280 and said $280 or we walk away. Son was firm on the price. I wanted it out of my driveway, so I said "sold!", took the $280 and handed my son the money plus $20 from my pocket on the stack. At least the car was out of my driveway. It's only a $20 difference. You spend that on fast food anyway.

Treat others how you want to be treated. Karma comes back (or whatever you believe in). I saw an ad for a 2001 Subaru for an awesome price. I took a look at the car, test drove it and knew that it was a deal I couldn't pass up. When it came time to haggle, she said to negotiate with her husband on the phone. I said "no need. I'll give you the asking price." We both walked away from that deal thinking we had won. 

Sunday, February 7, 2016

She wrecked two cars in a week! Fixing the Cougar's wheel bearing, etc. from hitting a curb.

What goes around, comes around. And I don't mean that in a wheel bearing sort of way. As a parent, I get to watch my kids repeat some of the mistakes of my youth. The registration was about to expire on the Thunderbird, so I was going to take it in for inspection after I got home on a Friday. But before I got home, she lane-changed and when she looked back in front of her, there was someone there that she ran into, smashing the left headlight, corner light, light mounting bracket, fender, bumper cover, and bending the bumper frame and hood. You kind of need those lights to pass inspection, so I had to wait until the new ones came from RockAuto.com. Oh, and she was ok - no injuries to either driver. We were down to one car - the Cougar.

Three days later, on Monday, this is what happened in the Cougar (if the video below works). I didn't have a dashcam in the Thunderbird, but I did in the Cougar. Luckily for her, she can relive this moment in HD video. There's no ABS in this car, no stability control, and no traction control. So when you lock up the brakes, it doesn't respond to steering.


She called to tell me about it while she was driving home and I could hear the wheel bearing moaning over the phone. She also said she had to hold the steering wheel at an angle to drive straight. So I knew I had at least a bad wheel bearing and probably a bent control arm or tie rod. She felt really bad about wrecking two cars. But she had to find a ride to work for the next few days. We'll need to go practice some driving techniques later.

With both cars broken, I was considering buying another car or truck. I took a look at the classifieds and had a few picked out. But we'll hold off on that for now.

I'd be a hypocrite if I was upset with her. When I was a teenager, I drove my mom's 1981 Datsun 210 with a 1.2L 4 cylinder engine, 5 speed, and rear wheel drive. For a car with negative horsepower, it was very difficult to spin the tires. But that's not going to stop a teenage boy from trying.

On a Sunday afternoon in 1988, as I crossed an intersection with gravel in the road, I thought it would be cool to spin my wheels in the gravel. I stomped the gas pedal as I shifted into second gear and turned a little to the right. My wheels cut loose and spun like never before. The back end swung left, wheels still spinning. I compensated for the slide as two guys on bmx bikes on the other side of the road about 100 yards in front of me got off the road. I overcompensated steering and with my foot still on the gas pedal because vehicle control wasn't yet second-nature, the car started to slide right and before I had time to correct it, my right rear wheel hit the curb. Then a soft grinding/humming (mostly humming) sound came from the rear axle going wonk-wonk-wonk, starting
at about 20 mph. The wheel was bent, and the bearing damaged.

So here's how the repair on the Cougar went. It's an early 1999 with a 2.5L V6, a 5 speed manual transmission, and an oil leak.

When she got home after hitting the curb, I took a look at the wheel. It's amazing this wheel held together and didn't lose air. The junkyard had one listed on their website for $45.50, so I went down there and they said they'd have to order it for $80. I went home to consider my options and called them the next day and they wanted $192 for a wheel. I said never mind and ordered one from RockAuto.com for about $136 including shipping.
Broken wheel
I was unfamiliar with the style of spindle nut on this car and thought the metal tabs had to be bent out. That was a mistake. Now I need a new spindle nut.

I removed the steering knuckle to press out the wheel bearing and was surprised when the whole bearing came out in pieces. Part of the problem is that whoever put this thing together the last time didn't install the outer snap ring to hold the bearing in. The problem with omitting the outer retaining ring is that if the bearing slides outward, then the CV joint will rub on the wheel knuckle.
Broken wheel bearing
Usually only the hub and inner race come out first as shown in the next picture.
Here I've cut slots in the inner race using my Dremel. I think it helps it come off easier.
The inner race with slots cut into it
The bearing puller works great to get these races off. It may take a few tries. But I oriented the puller wrong in this photo. Rotate it 90 degrees so the bolts don't bend when you press the bearing.
I have the bearing puller oriented 90 degrees wrong. It should be the other way to not bend the bolts.
Here's the new wheel bearing, about to get pressed into the steering knuckle. This kind is sealed. You don't need any separate wheel seals with this style bearing. Notice the sides of the bearing have the seals on, and you can't see any ball bearings inside.
New wheel bearing
Before installing the hub, I had to order and install the new retaining ring.
New outer retaining ring: TIMKEN RET177

Pressing the bearing into the steering knuckle using my press and a 36 mm socket on the inner race

To press the hub into the wheel bearing, you need to apply the force on the inner race. Otherwise, if you only apply force on the outer race, the inner race can pop out, along with the seal. If that happens, you may damage the seal. As I pressed it in, it took more pressure than I was used to. Then afterwards, I thought "maybe the hub got bent". I should have checked that before putting it back together. Luckily, they sell a wheel bearing set with a hub for a pretty reasonable price on RockAuto.com if I find out I need one. [Update: I checked later. The hub wasn't bent.]
Pressing the hub into the wheel bearing
Here's the new lower control arm with ball joint. This one is straight. I had to pry on this to get the holes to line up so the mounting bolts would go through. Maybe the frame got a little bent too.
New control arm with ball joint
Here's the old control arm. You can see how it's not straight.
Old, bent control arm
The nut and bolt that came with the new control arm didn't have the built-in washers like the original did. So I re-used the original. I know, it's a bad idea to re-use the lock-nut. I'm pretty sure it will still hold together.
Lower ball joint retaining bolt and nut
But, the new bolt fit in the same spot as the bolt to hold the strut in the steering knuckle. So I used it there. Since I saved this old bolt, it found a new home on my friend's Bobcat.

When I got it all back together, I threw the spare on and took it for a test drive. The steering wheel was still at about 70 degrees while driving straight. I missed the fact that the inner tie rod may be bent because it was hidden in the steering boot. So I ordered one of those (assuming it was bent, even before taking the boot off to look at it). With the alignment so far off, it won't handle well and will wear tires really fast. So I got out my laser ruler and did a quick toe angle adjustment. I released the lock nut on the tie rod end and turned the tie rod out about 3/8" or so until the wheel was straight again. Next week I'll replace the inner tie rod and the wheel.

Here's the damage report on the Cougar:
Bent & cracked wheel - $124.89 + $11.98 shipping = $136.87
Broken wheel bearing - $25.79
Bent control arm - $64.04
Bent inner tie rod - $19.88 + 6.19 shipping = $26.07
Wheel bearing retainer - $2.83 + $19.40 shipping = $22.23
Spindle - $35.00 + $18.93 shipping = $53.93
Re-mount tire - $unknown. I will owe my friend a favor.
Labor - one day off work unpaid + an evening or two

Total for parts: $328.93, not including the brand new tires that got worn out.

Update: One month later - wearing tires

I should have verified the toe angle. The toe angle changes when you drop it off the jack. I knew it changed some, but I didn't realize it changed so much. I was planning on replacing the inner tie-rod in a couple days. That still hasn't happened yet. After a month of driving on brand-new tires, the front tires are nearly worn out.


I verified that the strut wasn't bent by using a straight edge. I verified that the hub (what the tire bolts onto) wasn't bent because it doesn't wobble when the wheel rotates. But it still has positive camber. The only thing left that I can conclude is that the steering knuckle got bent when it hit the curb.

Update April 30

I replaced the bent steering spindle today. I got one off ebay for $35 + shipping. Here are the old and new spindles.


And you can see that the old spindle (foreground) is bent, compared to the wrecking yard spindle (background). I measured the angle between the hub and the strut mount on the new one and got 4.5 degrees. So if the wheel was positioned perfectly vertical, then the strut leans in at 4.5 degrees.

The old, bent spindle measured 8.6 degrees. So that resulted in an additional +4.1 degrees of camber. That'll wear the tire quickly.

I was trying to think how I would measure the angles on the spindles and while trying to go to sleep last night, I had the thought that I should just use the protractor app on my phone. It worked great. I just measured the angles of the strut and the hub, then calculated the difference.

After replacing the spindle, the toe angle was way off again, and I had to adjust it. Now I just need to do something about the cracks in the driver's seat.