Sunday, October 31, 2021

Rack & Pinion Replacement on a 1998 Camry

The rack & pinion was leaking on both sides and the passenger inner tie rod had play, so it was best to replace the whole rack & pinion assembly. I estimated that I could complete the job in a day and it actually went as expected, except that the included pamphlet said the job would take 2-4 hours. It took me eight hours.

Before starting, I remembered a problem I had on several previous jobs. I don't know if you've ever experienced this, but when you're sitting on the ground working on the car, sometimes you can wear the skin on your tailbone. You don't notice until you're in the shower the next day and it's a little too sensitive. I was careful to avoid that problem this time.

Here's a time-lapse of the entire repair.


There were only a couple things in the way that needed to be removed to get the rack & pinion assembly out. 
 
I had to remove the oxygen sensor. It sounds simple, but this took some time. Why do they make these electrical connectors so difficult to remove? They're in super awkward places so you can either see it or feel it, but often not at the same time. You need super-human strength to press the button enough to release the catch. So I just used a small slotted screwdriver on the opposite side of the button to release the catch and pulled on the wires (bad, I know) and it came right out, wires still intact.
 
I removed the bolts holding the sway bar mounts on both sides. This should be fairly simple, but there isn't enough room for a socket - just enough room for a box wrench, turning 1/12 of a turn at a time on the back bolts.

 
There's a nut holding the power steering hose to the rack on the passenger side. Here's a photo of that hose and bracket with the rack already removed.

Getting the hoses loosened wasn't too hard. A 17mm crow's foot on a long extension made it pretty easy. 

The inner tie rods weren't hard to remove from the outer tie rod ends. On cars this old, they could be too stuck to remove and you'd need outer tie rods also. Here's a photo of the outer tie rod end still attached to the wheel knuckle. (Rack & pinion already removed)

The most troublesome part of the job was disconnecting the steering shaft. I had to slide the rack toward the passenger side to get it apart or back together. I used a couple ball joint separator wedges to pop it off. The steering linkage seemed to be spring-loaded. Maybe there was something I should have disconnected on the inside to make it easier. But it's done now.

At this point with the steering disconnected, I made sure to keep the steering wheel centered so that the clock spring in the steering wheel wouldn't get hyper-extended. The wheel should only go one and a half turns from center to either side. Much more than that could possibly damage the clock spring. You'll know if the horn or other buttons on the steering wheel stop working.
 
I tilted the rack towards the front of the car and slid it out the driver's side. Here's the new one going in the same way.

Once I re-connected the steering shaft, I checked if the steering was centered. Of course it wasn't and I had to disconnect the shaft and re-adjust a couple times until it was one and a half turns from center either direction. 

Flush

I connected an extension hose to the return line and capped the return line on the reservoir. I filled the reservoir and had my assistant (ok my daughter) run the engine for about two seconds to get some air out. I then had my assistant turn the wheel all the way both directions to get more air out, all while adding fluid as necessary to the reservoir. After flushing and re-connecting the return line, we didn't have a problem with air in the fluid.

Alignment

After everything was put back together, I used a laser level against the wheel to mark the ground and set the correct toe angle for each front wheel.


Wednesday, September 15, 2021

Why the Remanufactured Transmission Lasted Only 5000 Miles

Bad Luck

We sometimes joke about selling a car when a major problem starts to show symptoms, but I never considered concealing it and selling it. Unfortunately, I think someone did that to Cameron. He had saved up and just bought himself a car the day before this happened:

I could feel the anguish and tears in his voice when he called me. "Dad, can you come pick me up?" It pierced my heart. "Where are you?"

Before we get to that point, let me tell you what led up to that. Cameron needed a car and was borrowing my 1996 Thunderbird. He grew to like it and asked if he could just buy it from me. I said "Sure. $200 cash plus your $200 interest in the Contour we bought together." Done deal. 

He drove that Thunderbird for several months until something happened to it while he was doing donuts in the snow. It felt like a driveline vibration, but still was there when you rev it up in park. The vibration didn't change as the revs came down. I think the flex plate got bent or something and made the torque converter off balance. It vibrates even on rev-down, so it's not a misfire. Pulling the transmission was going to be some work, so he thought it would be cool to put a Mark VIII engine in it. 

We went to the dealership where they had a 1997 Mark VIII that was advertised for $1999. We asked for an out-the-door price and they said $3500. Yeah, right. During negotiations, we found out it was a repo. We finally got out the door for $2250 because we were nice and they enjoyed doing business with us.

Fast forward about six weeks or so. Cameron was doing donuts in the snow again. But this time the engine started making noise. When you rev it above 3000 or so, it made a horrible knocking noise. Low RPM throttle punches don't make noise. So we pulled off the valve cover to take a look. Compression was 155 on all cylinders except one at 135. As we were cranking the engine for the compression check, we noticed that the oil coming into the top of the cylinder head looked like it had metal flakes, kind of like metal flake paint - really fine particles. The cam bearing was scored too. 

My best guess was that the engine was starved of oil at some point recently. It could have been when it was repossessed. So that engine needed to be rebuilt. I'm guessing a main crankshaft bearing went bad - not a rod bearing. He was so disappointed. He told me that his mind was insistent, saying "don't buy this car" during negotiations. But he did anyway. Hey, it has a 290 horsepower V8. Should have listened to the still small voice.

So the Lincoln got to sit next to the Thunderbird at the top of the driveway while he borrowed my Cougar to get to work and saved up more money to buy another car. 

Classified ads can be really tempting. That's where he found the 2010 Lincoln MKS. Black. He went to take a look at the car and fell in love. He remembered me saying not to borrow money for a car. It might break down and then you'll be stuck with a broken car, a car payment, and a repair bill you can't afford. But this was less than $3000 above what he had saved. He could pay that off fairly quickly. So on his day off, he and his friend went to go get the car. He didn't ask me to come along because I think he was afraid I would say something about not borrowing money. He's probably right. 

Wednesday evening, he brought it home. I drove it. It was nice. I didn't give it full throttle, but I could tell it was fast. The next day, he took it to the DMV and got plates for it. Then I got the phone call. 

"Dad, can you come pick me up?" By the tone in his voice, I didn't know if he wrecked it or if it broke down. "Where are you?", I asked. He said "I just got on the freeway and it started shaking and went into neutral." I said I'll bring my truck and come get you. 

I didn't even check to make sure my tow strap was in the truck. But luckily I had a super heavy ratcheting strap that worked. When I got there, the car wouldn't even start. So I towed it to the next exit and we got off the freeway. We had to stop because the steering wheel started shaking. Adding injury to injury, the front right tire was flat. The tire was destroyed, but the rim still looked ok. 

It didn't take too long to get the tire changed. At least the spare tire had air. While we were changing the tire, I had the jumper cables connected and my engine, idling. That was enough to get the MKS to fire up for the drive home. Power brakes are nice, especially when being towed.

We checked the engine codes and didn't find any transmission codes that would explain it. So I scrolled through and found an entry for "input shaft RPM above expected". That'll do it. During a test drive around the block, he gave it a little gas and the transmission started slipping. I said "whoa, whoa" because I kind of cringe when I can feel the clutch slipping. Driving constant speed, the slip read about 0.5 RPM, essentially zero. But when he gave it a little gas the next time, it hit 336RPM. That's it. The transmission was slipping. 

We got home and he parked it. Reality was starting to sink in. Mom asked "is it the transmission?" and that was too much for Cameron. He cried "yes" as he walked back into the hallway, leaned against the wall and slid down to the floor sobbing. All the frustration of having three cars break down in less than three months came to the surface. It broke my heart. I sat next to him and his sister sat on the other side giving him a hug. Mom tried, but she can't get down on the floor. Well, she could, but getting up would be another story.

Here's where parenting gets hard. Giving kids everything they want isn't good. You don't want to spoil them. But you want to be there for them when they need you. How much should you help them and how much do you let them struggle to make their achievements on their own? 

I considered it thoroughly, weighing my options, relying on God for guidance. I found a transmission on Rockauto and it was about $2600 with a $1000 core. I said I could order it and he could pay me back over time. So with taxes and shipping, it was around $4200. I bought it. I was worrying if I had done the right thing. So in a thought, I wondered if God would approve of what I did. I felt a still small voice in my heart say "you did just what I wanted you to do." 

Sister asked if there was any recourse from the seller. Private party sales are as-is, so unfortunately, no. But I was thinking that there's a special place in hell for people who knowingly sell a car with a major mechanical problem and don't disclose it. I'm not saying that's the case here. He may well not have known. I think he did. But for anyone that does know, this is the kind of impact it can have. 

It kind of annoys me that the catalogs will list parts that don't fit your car. As you can see, there are two transmissions that are listed, but one is not for the EcoBoost version. There is absolutely no reason to list a part that doesn't fit the selected vehicle.

BRM = 6F55; GRM = 6F50

I ordered the one that was in stock. It's not like me to order the wrong part when there is more than one part number listed. I'm pretty sure that when I ordered it, the other part number wasn't there. They even have you enter your VIN to "make sure" you get the right transmission. That didn't work.

From checking things since then, it looks like the AA5Z7000GRM is the 6F50 for non-EcoBoost, and the AA5Z7000BRM is the 6F55 for the EcoBoost. Why couldn't they just include that crucial bit of information?  

I ordered the AA5Z7000GRM (6F50) and it came with a three-bolt-hole torque converter. But this MKS EcoBoost had a four-bolt-hole torque converter. So he installed the 6F50 anyway, not noticing that the flywheel had a four-bolt pattern and the new torque converter had a three-bolt pattern. So he had to take the transmission out again. 

To make it fit, he was going to swap out the torque converter, so he turned in the old one as a core when he ordered it. But then he cancelled it and bought the three-bolt flywheel instead because it was cheaper that way. Unfortunately, the torque converter core already left for the remanufacturer, so that'll ding the core credit on the transmission. I'm not sure what would happen if I turned in a 6F55 as a core for the 6F50. I might pay for shipping and get no credit. That's a big risk.

After he got it all back together, and maybe not too surprisingly, it runs and drives. 

It had a bunch of transmission error codes before the swap, and there was a tuner program loaded. Going back to stock with the tuner produces a bunch of errors and the engine doesn't idle right. I'm not sure what the tuner did to the PCM, but it doesn't seem like it re-installed the stock program correctly. Or it was covering up problems. We'll find out more on this later.

The air conditioning didn't work well because the radiator fans wouldn't come on until the engine warmed up. The PCM controls the fans and the AC clutch, so it must have been the tuner messing with the wrong things. The fans are supposed to come on with the compressor, but the tuner made it so the fans only come on due to coolant temperature. 

Transmission Failed Again

Fast forward a few months and 5000 miles later. We learned an expensive lesson. The transmission needs to be programmed to the computer. That's a new one for me. The new transmission never shifted right. Then it started slipping and making a whirring noise when idling. 

So I decided to check if I could return it under warranty. Going through the online questions, it asked if I discovered the problem before or after installation. After. Was it the correct part for the car? No. Their response: Sorry, you can't return the part. 

Ok that was a little disappointing. So I returned the 6F50 as the core. Yup, the exact same transmission they sent me only a few months ago went back as the core. 

I took the original 6F55 down to Action Transmissions and had it rebuilt. While there, I was informed of the programming procedure. There's a number for the solenoid pack that needs to be programmed into the PCM so it will shift correctly. If I had read the instructions that came with the transmission, I would have known that. That's probably why it only lasted about 5000 miles. I took my piece of humble pie and waited not quite two weeks for them to rebuild it. 

Hard Work

I was really tired, but spent several evenings and afternoons helping him fix his car. We have a neighbor who was very generous and let us use his shop with a lift for a few weeks. That's how Lincoln helped us fix the Lincoln.

While the engine was out, we replaced the water pump. Was there really no better option than making it a timing chain-driven water pump? Seriously. Who does this? Oh yeah, Ford. You can see the water pump sprocket about ten inches above the crankshaft sprocket.


We also changed the oil on the PTU (aka transfer case) while it was off the vehicle. Who makes a PTU with no drain plug? Again, Ford. The PTU fluid was definitely due for a fluid change. After draining it out the fill hole, I put another cup of 75W140 in there to flush it by turning the shaft and turning it different directions. The new fluid came out looking as bad as the old fluid. 

Just in case we ever have to do the crankshaft position sensor, here it is, located behind the flywheel. It's actually accessible from the outside of the engine. 


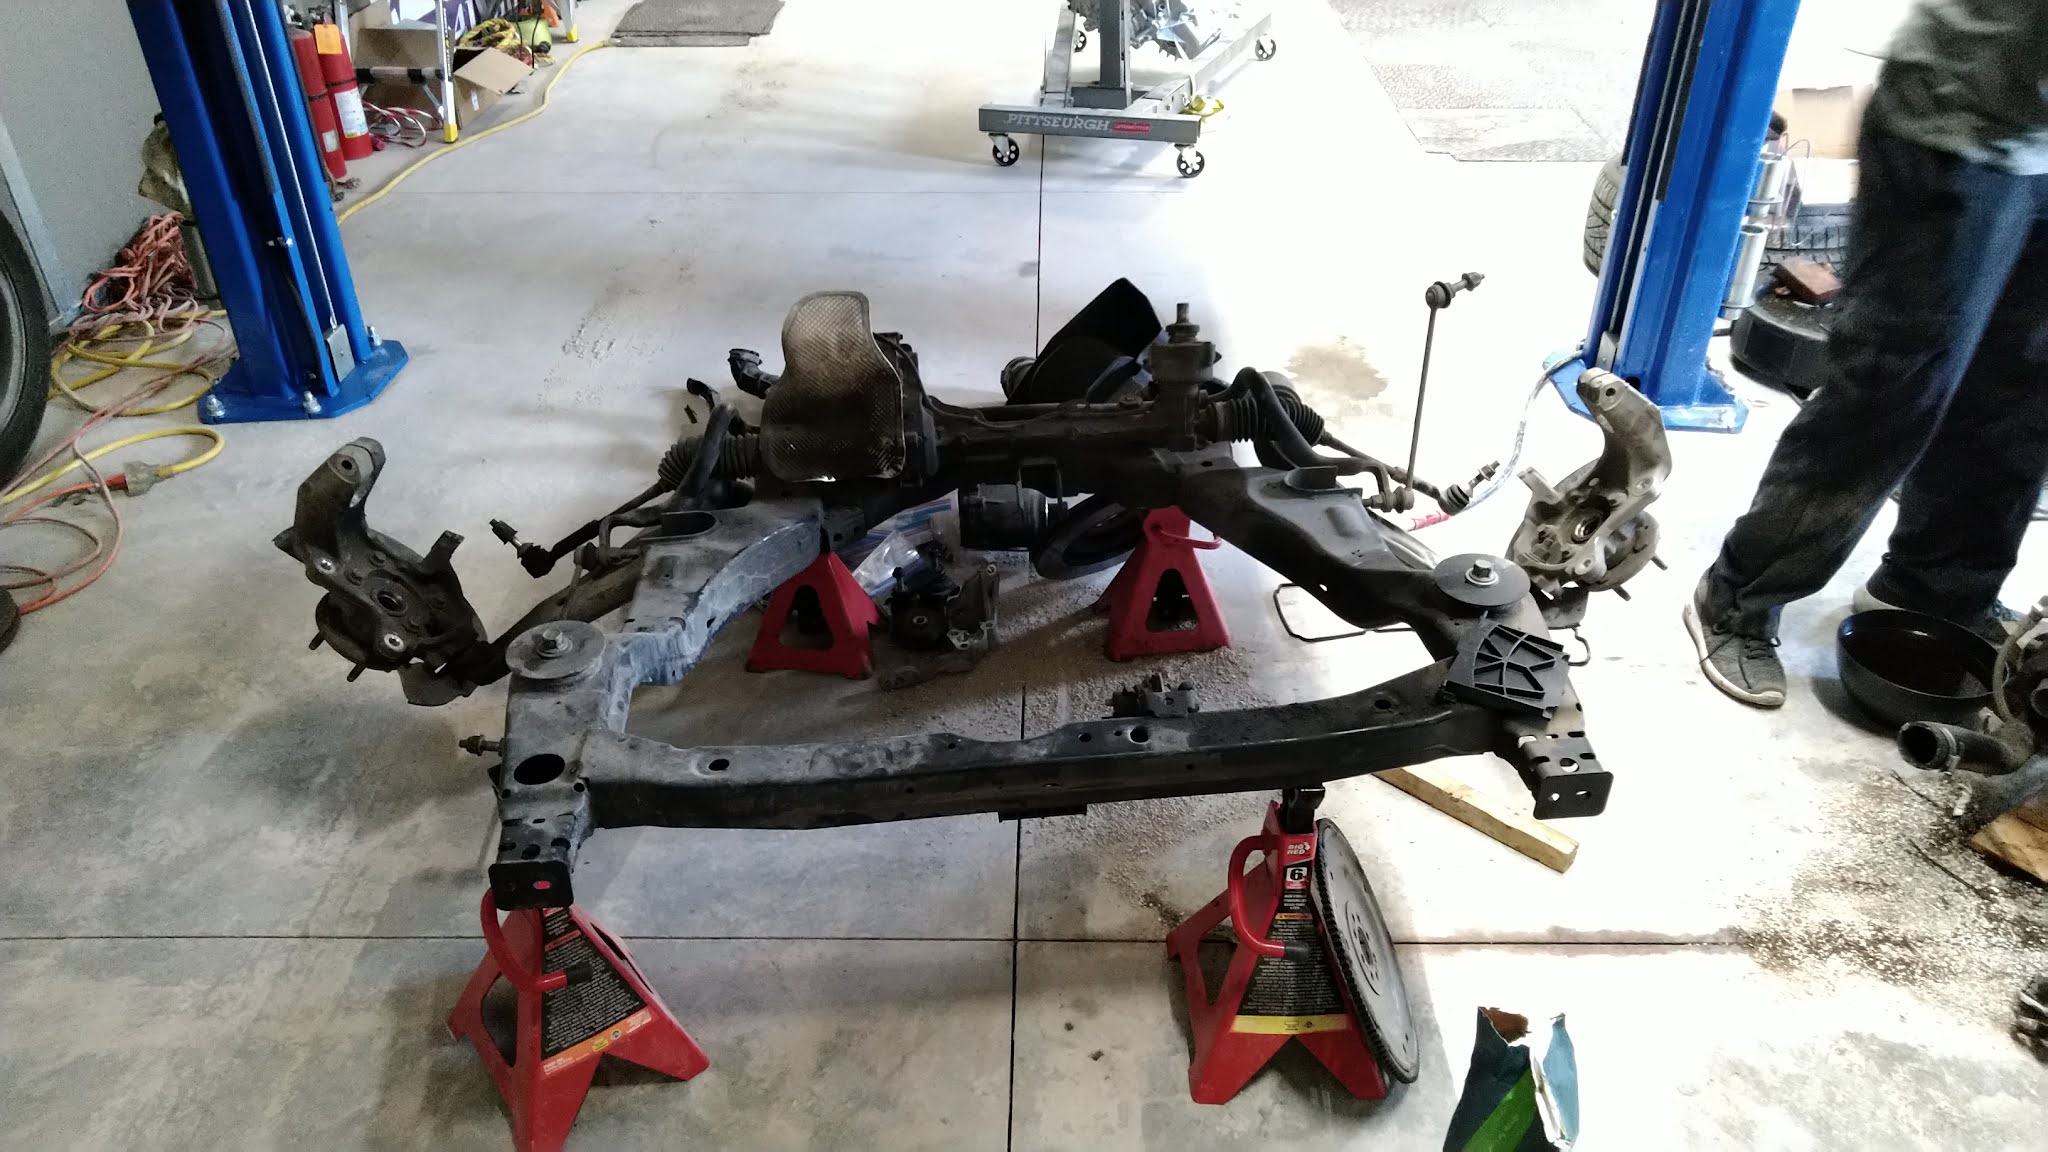
 Here's the sub-frame. The engine is on the floor to the right.


Here's the new transmission connected to the engine, ready to go back in the car.


There are two ways to mount the rear transmission mount. Once you figure out the right way, it'll fit. 


Oh No!

We got the car re-assembled and fired it up. The engine was sounding like it wasn't getting oil pressure. Then I heard a pop and looked under the car and saw a bolt had fallen to the ground along with a large puddle of oil. Shut it off!

After a close inspection, we determined that the oil supply line to the front turbo had the banjo bolt loosened, which we forgot about. There wasn't enough kitty litter in that small bag to clean this mess up. About four quarts were pumped out onto the brand-new garage floor. I was wondering if we'd ever be allowed back into that garage with the mess we made on his new concrete. 

More Lessons Learned

We got it all back together and were ready for the transmission to be programmed. Before I had the guy come over, I used the tuner to re-program the PCM back to stock. It only took him about 20 minutes to program the transmission. When we fired it up, both the check engine light and the wrench light were on. I was concerned. The wrench light in our Freestyle meant that the transmission fluid pressure was too low and it was in limp mode.

After scanning for codes and looking at the sensors, I found that we forgot to plug in the camshaft position sensor on bank 1. Also, the MAP sensor was reading 15 inches Hg with the engine off, when it should have been 25 at this altitude. We plugged the cam position sensor back in, but the permanent code didn't go away when we reset the check engine light. 

Here's where my ignorance cost Cameron another $75. He bought a new cam sensor and installed it and the permanent code still was there. I did some research on the internet and found that permanent codes don't go away with a reset or by disconnecting the battery. They only go away when you fix the problem and drive it enough so that the computer is satisfied that the problem is fixed.

The MAP sensor is probably why the car went into limp mode when the tuner programmed it back to stock. Like drugs minimizing pain, the tuner probably ignored the bad readings from the MAP sensor. 

With a new MAP sensor, a new camshaft position sensor (now plugged in), new radiator hose, and the transmission successfully programmed ($150), it seems like it's all repaired. Hopefully it lasts.


Wednesday, August 25, 2021

Fixing the Ice Maker on my Kenmore Refrigerator

I have three full size refrigerators. I had two, but my mom's fridge died. The compressor failed. I can fix stuff, but wasn't going to put a new compressor in that old, small fridge. So I bought a nice used fridge that had an evaporator error code. Mom's kitchen cabinets were a few inches too low and this fridge wouldn't fit. She didn't want to tear out her cabinets so she got a small fridge and didn't need the one I got. I eventually fixed my fridge to get it out of my garage and put it in the kitchen to run it and test it out. Then people in my house went shopping and loaded it up. Apparently two fridges weren't enough for eight people.

Fast forward a couple years and error code SY EF (for the evaporator fan) showed up on the temperature display. If you search for 240389646.pdf, you'll find the wiring diagram for my fridge. It's a Kenmore, model 253.70313211, but everywhere online doesn't use the decimal point and just says it's model 25370313211.  

So when the evaporator fan failed on my Kenmore fridge, I had to unload the food into all the available space in the other fridges. I ordered a fan motor and figured this would be a great time to fix the ice maker. Or try.

The ice cube tray would never fill with water. I checked the valves and they all worked. I connected power to the ice maker water valve and water came out into the ice tray.

The motor that rotates the ice cube tray was fine. I took it out and connected a couple AA batteries to it and it ran the motor. The touch-arm (that detects if the tray is full) also was moving just fine. The switch on that arm tested fine. The ice-maker evaporator fan worked fine too.

The Source of the Problem?

The temperature sensor in the ice-cube tray is a negative temperature coefficient thermistor. I measured the resistance and it was around 5000 ohms at room temperature. After much searching, I found that it should have been closer to 11k ohms at room temperature. I found that information in the service manual in "February 2011 FGHB2844LFE 5995556437 Frigidaire Bottom Freezer Refrigerator Service Manual.pdf". It looks like Frigidaire made this fridge for Kenmore.

I put the ice cube tray in the freezer, which was around 0 degrees F and came back after an hour to read the resistance, and it was about 28k ohms. According to the chart, that means it was reading 32F. No wonder the computer never turned on the water. It thought the ice tray was too warm. 

Stupid Tax? Nope. Lazy Tax.

So I ordered the thermistor from Sears parts and paid way too much because I didn't feel like spending hours looking through the mouser.com catalog for the correct thermistor that really costs less than a dollar. Seriously, there are thousands of different kinds, 6048 of them. At least I didn't order it from Amazon where it was about $90. They must be making bank. There are other thermistors in that fridge that use the same resistance to temperature conversion. So I can deal with different style plugs - just cut and splice. 


First, I pulled out the shelves and the ice maker tray. 

Next, I removed the two screws holding the insulated front panel.


 This top panel comes out with a 1/4" socket or a long screwdriver bit holder.

I unplugged the wires and lifted up on the tab and the twist motor and ice cube tray then came out.


Next, there's this mounting bracket on the top. I pulled this toward me and it slid off the mounts. 
 

Next, I removed the three screws in the front holding the icemaker box in place. I didn't really need to pull the whole box out, but if I needed to service the evaporator fan, it needed to come out.


 Here's the thermistor kit I ordered.

Before I installed it, I verified the resistance at room temperature matched the temperature chart. I also used the foam to hold it against some frozen meat and the resistance converted to 17F. Then I used my infrared thermometer and it also said the meat was 17F. That was good enough for me, so I installed it.

I shouldn't have used any of the thermal mastic that came with it because it never dries. I hot-glued one side so it would stay put. Then I put some foam insulation tape on there to hold it in.

Here's what it looks like just before re-installing it.


 So I installed it and the temperature reading was wrong. I entered diagnostic mode on the fridge and the ice tray was reading 26F even though my IR thermometer showed 1F. 

I back-probed the terminals and measured the voltage across the thermistor and it was about 3V and a little tingly. More carefully, this time I measured AC voltage and didn't see any significant AC voltage on the multimeter, but still felt tingly on the door handle. I inadvertently discovered that there was a 117V AC difference between the thermistor and the fridge door handles while I was probing it with my volt meter.

Since I had replaced the plug, I thought maybe I swapped hot and neutral. Nope. The neutral wire was the ribbed side. Hot went to the black wire and that was confirmed on the wiring diagram. 

Now it makes ice once every few days or so. I still need to check the power connector on the main board to make sure it wasn't installed backwards from the factory. I'll update this post if and when I check that. 

For my future reference, a good substitute thermistor has parameters R = 10k ohms, B = 3320K, and they are only $1.72 each.


Sunday, August 1, 2021

Factory Keyless Entry Code Location on 2007 Ford Freestyle

The code is on a sticker on the back of the smart junction box in the driver side footwell, above your left leg. 

There are three nuts holding it in place: one on the bottom, and two on the top. If you remove all three nuts, you can move it enough to get an inspection mirror and read the code. Here's an example picture: 


Factory keyless entry code location on 2008 F250 Super Duty

The factory keyless entry code is on a sticker on the back of the smart junction box (looks like a fuse box).

The smart junction box is on the passenger side footwell. Here's how I got my code. 

1. I pulled off the fuse panel cover. 

2. Pull up the tread panel. 

3. Pull off the trim panel over the smart junction box.

4. Remove the two screws shown here in the top right and bottom right of this picture. I didn't see the top left fasteners when I was working on it.


5. Use a small inspection mirror and flashlight to read the code. 

Here's where the code is on the sticker:

I also had to replace the keypad on the door because the 9-0 button wasn't working. That wasn't too hard. I just had to remove the door panel and there's a clip holding the keypad in place. 

The following information is from the owner's manual, pages 146-147.

Anti-Scan Mode (Keypad Lockout)

If you enter the wrong code more than 7 times (35 button presses), then the keypad light will flash and you'll be locked out of the keypad for a minute. You may not be able to see the keypad light in the daytime. But you can cancel this anti-scan mode by pressing unlock on your remote or turning the key to the on position. 

Creating a Personal Entry Code

This personal entry code is also associated with memory seats, mirrors, and pedals, if equipped. 

1. Enter the factory key code. 

2. Within five seconds, press 1-2. 

3. Enter your new five digit personal code. Enter a sixth digit: 1-2 if you're driver 1; 3-4 if you're driver 2.

4. The doors will lock and unlock as confirmation that the new code is entered. 

Erase all Personal Codes

1. Enter the factory code. 

2. Within five seconds, press 1-2. 

3. Within another five seconds, press and hold 1-2 for two seconds. All personal codes will be erased. Only the factory code will work.


Monday, December 21, 2020

1999 Cougar Engine Swap

When looking for a cheap, small car, I decided that, for the money, I could find an engine for the Cougar for much less than buying a working car. You might ask why the Cougar needed an engine after this repair. Well, the brand new timing chain tensioner that I installed failed. That allowed the chain to slap on start-up and the plastic chain guide broke and got ground up into the oil pan. That clogged the oil pickup screen and starved the engine of oil. I did failure analysis for fun. Ok I was trying to see if the engine could be saved. I fixed it and it worked fine for a few miles until it developed a rod knock.

So when I saw a 1998 Contour for sale, I knew I found an engine for the Cougar.  I could have replaced the power steering rack on the Contour and drove it, but then how exciting is a four door automatic when I could have a five speed coupe? 

I was going to help my son do the engine swap so he could drive the Cougar, but he was borrowing my Thunderbird to get to work and he decided it would be easier to just buy my T-bird from me than do the engine swap. Deal. I'll swap the Cougar engine and drive it. Looking back, I think he might have done the smarter deal. But mine will be more fun . . . after a lot of hard work.

I figured it shouldn't be too hard to swap an engine. I was thinking it would only take one day to remove the Cougar engine, one day to remove the Contour engine, one day to swap, and one day to put it back together. Just unhook stuff, unbolt stuff, use the engine crane and within a few days, there you go! I wish it was that easy. I seem to always underestimate the time it takes me to do these projects. Here's how long it actually took with life happening between Saturdays and evenings working on the car.

September 21

I was excited to start this project. I made good progress unhooking stuff.

September 22

Still highly motivated and making good progress. I dropped the engine out the bottom. (I lowered it with my shop crane.) 

Projects like this take less time in my head than in reality. I never account for things like broken bolts, broken drill bits, and needed replacement parts.


September 26

Raise the car higher and slide the engine out the side. This should have been done on day two, but it's ok. I'm not too far behind schedule. It's still warm enough outside. 

And pull the engine off the transmission.

October 1

Take pictures of the donor engine before unhooking everything.  

October 9

Drop the engine out of the Contour. Where did the time go? I was supposed to be done with this project in no more than three Saturdays with working on it some weekday evenings.

October 13

The sub-frame bolts kept turning the nuts because of the rust. There was a metal grate and sound absorber over the nuts, but it wasn't removable without cutting through it. So I had to cut through the floor to access the nuts and hold them with vice grips.

Pulled the Contour's engine out the side.

And when you forget to drain the transmission fluid, it goes all over the driveway.

October 14

Pull the Contour's engine off the transmission.

In addition to just swapping the engine, there were things that needed attention. 

  • Replace the crankshaft oil seals, front and rear.
  • Replace passenger side CV output shaft seal.
  • Replace the clutch disk. 
  • Swap power steering pumps. (The Contour's PS pump ran dry for who knows how long.)

Pre-Task Plan

Re-assembly is where you don't want to forget anything like a rear crank seal, so I decided to make a list of things to do, in order, to get the engine in. I didn't expect the list to be this long.

  1. Replace rear crankshaft seal.
  2. Install new clutch disk.
  3. Tighten axle mount bolts on rear of engine.
  4. Install Bottom Engine Mount bolts
  5. Install starter
  6. Replace P/S pump
  7. Replace front crankshaft seal
  8. Clean CV splines and reinstall CV shaft
  9. Re-install engine wiring harness
  10. Fix speed sensor wire (it broke)
  11. Work exhaust manifold bolts in case cats need replacing
  12. Slide engine under car
  13. Tie up all loose connections on engine before lifting
  14. Lift engine
  15. Install four chassis bolts
  16. Bolt in top Engine mounts
  17. Connect computer harness & ground wires
  18. Connect power steering reservoir supply & return hoses
  19. Engine mount ground cable
  20. Bolt in struts
  21. Install fender shrouds
  22. CV axle nuts, Brakes, strut, sway bar links
  23. Connect steering linkage
  24. Shifter cables
  25. Clutch hose
  26. Brake hoses
  27. Connect evap vacuum hose 1/8"
  28. Connect evap hose 3/8"
  29. Climate control vacuum hose
  30. Brake booster vacuum hose
  31. Connect fuel supply & return
  32. Connect wiring harness on driver side
  33. Accelerator & cruise cables
  34. Battery ground cable
  35. Install radiator/fan assembly
  36. Radiator hose assembly
  37. Fan wire & other wire (Yeah, I don't know what it connects to at the moment.)
  38. Connect heater hoses
  39. Connect the three coolant reservoir hoses
  40. Install P/S cooler
  41. Mount temperature sensor
  42. P/S fluid
  43. Air filter box
  44. Air filter & hose, connect MAF sensor, PCV hose
  45. Install O2 sensor to replace the one I broke.
  46. Re-install exhaust heat shield
  47. Body ground cables
  48. Install battery (and then take it out again because it was in the way)
  49. Engine oil & filter
  50. Mount exhaust
  51. Re-connect fender rods
  52. Bleed clutch
  53. Grease ball joints
  54. Replace sway bar links
  55. Replace brake calipers
  56. Bleed brakes
  57. Wheels & torque lug nuts
  58. Top off transmission oil
  59. Install new AC accumulator
  60. Evacuate and re-charge the AC. (Need to add another 0.2kg R-134A because it only took 0.55 kg and won't run when it's this cold)
  61. Install new windshield wipers
  62. Install air dam deflector
  63. Get new tires
  64. Install DVR dashcam
  65. Fix brake sensor wires
  66. Replace idler pulley
  67. Flush heater core

 October 17

Removing the rear crankshaft seal works better using a screw than using the actual seal puller tool. There's less risk of damaging the crankshaft sealing surface with the screw method than with the seal puller. I drilled into the metal part of the seal and used a claw hammer to pry off the old seal. You can see the seal puller in the top part of this photo. It doesn't work. It's pretty useless.

It looks like there's only one way the flywheel can go on to make all the holes line up. I like that. It mistake-proofs the assembly. The Japanese call that poka yoke.

I found that it would have been easier to connect the engine and transmission if I had two engine hoists. Instead, we had the engine on the hoist and two-person-lifted the transmission to connect it to the engine. It was still way easier than trying to mate the two with the engine in the car.

Ouch!

When I was trying to pull the CV shaft out of the wheel knuckle, as soon as I got it clear, I smashed my finger tip between the CV shaft and the brake caliper. That stinkin' hurt. I was doing my best not to say bad words. "Sheesh, farmin' dog meat! That hurt!" I felt through the glove for any broken bones. No blood. Seems ok. It'll probably leave another mark on my fingernail that'll show up in a week. Amazingly, no mark. But there was a mark on that same fingernail from an injury a week or so earlier that I can't remember. 

"Dog meat" is my curse word. My son questioned that phrase when we were working on a car together. Something happened and that's what came out of my mouth. 

November 3, 4, 7

Installing the engine, transmission, sub-frame assembly. It doesn't look like it, but there was enough room to slide the engine in from the side under the fender. From there I used the shop crane to lift it into place.

The engine is finally in place. Notice that I moved the jack stands before putting all that additional weight on them.


November 11

I was about to connect the throttle cable when I realized it didn't match up. Had to swap the throttle assembly & clean the EGR passages while I was in there. Don't want all that carbon build-up to trigger the check engine light. Been there done that. I got the insufficient EGR flow trouble code before on the old engine.

November 14, 17

Install radiator etc. 

November 21

Back when I tried to unbolt the exhaust on the Contour, three studs on the exhaust pipe broke off. So I was trying to drill out the broken studs when a drill bit broke and sprung back and hit me hard enough to draw blood (injury number two on this project).

Then after all that, I was mostly done with drilling out the broken studs when I realized I had the wrong pipe end and it didn't match up with my catalytic converter. All that work drilling out those studs was for nothing. I had to swap in the exhaust pipe from my old engine.

November 28

Replaced engine oil & filter. 

So I went to unbolt the exhaust pipe and broke two more studs because they were seized. I had some cheap drill bits and spent a good part of another day trying to drill them out. Finally I went to the hardware store and got a couple good drill bits. I don't know why I didn't do that in the first place. It would have saved so much time.

December 5

Install new sway bar links. Install new rear catalytic converter. Here's how I found the old cat was bad. The honeycomb structure was deformed from intense heat due to a misfire. Here's what it looked like on the inlet side. When I saw this, I wasn't going to put it back on. Maybe that's why the old engine was so weak.

Here's what the new catalytic converter looked like.

December 14

Which Brake Size Do I Have?

I tried to open the bleeder valve and broke it off because it was seized. Then I tried to open the bleeder valve on the other caliper. It also broke off. So I decided I would order new calipers instead of rebuilding these. The parts listings showed two different sizes of rotors: 260 mm or 278 mm. So I measured my rotors and they were 260 mm. I ordered the calipers for 260 mm rotors. So far, so good, right? 

When the calipers arrived, I removed the old ones only to find that someone put the smaller rotors on when it should have had the larger rotors. Thanks to that mistake (not mine!), now I have all the hardware for the 260 mm brakes instead of the 278 mm brakes.  

I'll have to order new 278 mm rotors and swap the caliper mounting brackets to go back to the original brake size. But not today.

December 15

Trip to the DMV to get temporary tags.

December 19

Air up the tires. Replace wiper blades. Air Conditioner - replace the accumulator, evacuate and recharge it. 

December 21

Got a set of new tires at Discount Tire. Still no check engine light, so before taking it to get emissions tested, I'll use my OBD-II scanner to make sure it's ready.

How Long Did it Take?

That project took about 13 weeks - at least eight Saturdays and twelve weekday evenings.

This is why old cars like this go to the junk yard instead of getting new engines. Sixty hours of labor at $60/hour would be $3600 in labor costs. Blue book value on this car isn't even $1000. So why did I even do this? I'm cheap and didn't want to spend that kind of money on another car right now. Besides, work is good for the soul and builds character. 

Oh yeah, and I had to prove that I could finish a difficult project because there's a Talon transmission that's been in my garage for seven years, still not finished.

Differences

This information is just for anyone else interested in this kind of engine swap. Here are some things that were different on the Contour compared to the Cougar engine:

  • Throttle linkage / throttle assembly 
  • Coolant temperature sensor
  • Rear catalytic converter
  • Exhaust pipe between all three catalytic converters
  • The aluminum plate between the engine and transmission has an access hole in the  automatic transmission version, but not in the manual version.
  • The manual trans uses a different bolt hole in the engine oil pan than the automatic, but there are two holes in the engine oil pan on that side, so the oil pan works for both auto and manual transmissions.


Thursday, November 26, 2020

Are Plastic Wheel Chocks Safe?

I went to Wal Mart looking for a wheel chock for my car. I asked an employee where they were because I couldn't find what I was looking for. When he pointed out this one, I knew why I couldn't find it. I was looking for a black rubber one. I had no idea they made plastic wheel chocks. 

I scoffed at the idea and was walking away when I got the idea to test it. I can afford to waste $3.47. So I went back and picked it up. Since they sell these in their automotive section next to the jack stands, I deduced that there were some people that would try to use these on a car. The label says don't use on tires larger than 21 inches. If you have a car with tires 21 inches or less in diameter, you don't have a car. You have a go-kart. 

Besides, would you trust your life getting under a car supported by a plastic wheel chock? Me neither. 

I put the chock in front of my pickup truck and let it roll down the driveway. Check out the results.